Developer Guide
- Acknowledgements
- Setting up, getting started
- Design
- Implementation
- Documentation, logging, testing, configuration, dev-ops
- Appendix: Requirements
- Appendix: Instructions for manual testing
- Appendix: Planned Enhancements
- Appendix: Effort
Acknowledgements
- Libraries used: JavaFX, Jackson, JUnit5
- This project is based on the AddressBook-Level3 project created by the SE-EDU initiative.
- Ui components (command bar / command message box) T09-4 AY2122S2 and reminder list T17-1 AY2122S2 are adapted from past-year-projects
Setting up, getting started
Refer to the guide Setting up and getting started.
Design
Architecture
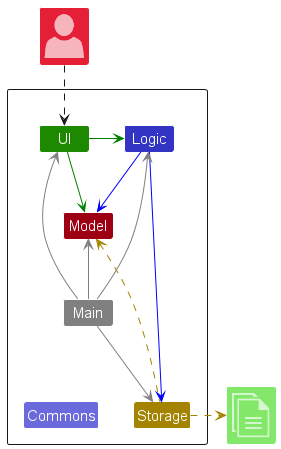
The Architecture Diagram given above explains the high-level design of the App.
Below is a quick overview of the main components and how they interact with each other.
Main components of the architecture
Main (consisting of classes Main and MainApp) is in charge of the app launch and shut down.
- At app launch, it initializes the other components in the correct sequence and connects them up with each other.
- At shutdown, it shuts down the other components and invokes cleanup methods where necessary.
The bulk of the app’s work is done by the following four components:
-
UI: The UI of the App. -
Logic: The command executor. -
Model: Holds the data of the App in memory. -
Storage: Reads data from, and writes data to, the hard disk.
Commons represents a collection of classes used by multiple other components.
How the architecture components interact with each other
The Sequence Diagram below shows how the components interact with each other for the scenario where the user issues the command delete 1.
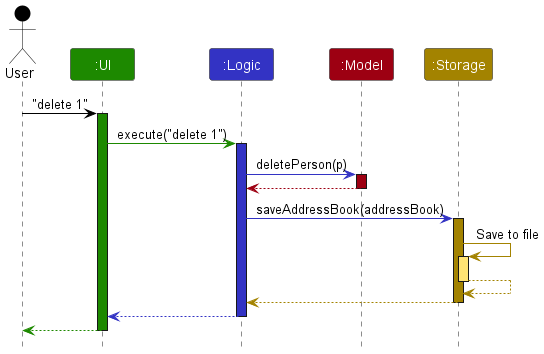
Each of the four main components (also shown in the diagram above),
- defines its API in an
interfacewith the same name as the Component. - implements its functionality using a concrete
{Component Name}Managerclass (which follows the corresponding APIinterfacementioned in the previous point.
For example, the Logic component defines its API in the Logic.java interface and implements its functionality using the LogicManager.java class which follows the Logic interface. Other components interact with a given component through its interface rather than the concrete class (reason: to prevent outside component’s being coupled to the implementation of a component), as illustrated in the (partial) class diagram below.

The sections below give more details of each component.
UI component
The API of this component is specified in Ui.java

The UI consists of a MainWindow that is made up of parts e.g.CommandBox, ResultDisplay, DashboardDisplay, ClientDisplay, StatusBarFooter etc. All these, including the MainWindow, inherit from the abstract UiPart class which captures the commonalities between classes that represent parts of the visible GUI.
The UI component uses the JavaFx UI framework. The layout of these UI parts are defined in matching .fxml files that are in the src/main/resources/view folder. For example, the layout of the MainWindow is specified in MainWindow.fxml
The UI component,
- executes user commands using the
Logiccomponent. - listens for changes to
Modeldata so that the UI can be updated with the modified data. - keeps a reference to the
Logiccomponent, because theUIrelies on theLogicto execute commands. - depends on some classes in the
Modelcomponent, as it displaysPersonobject residing in theModel.
Logic component
API : Logic.java
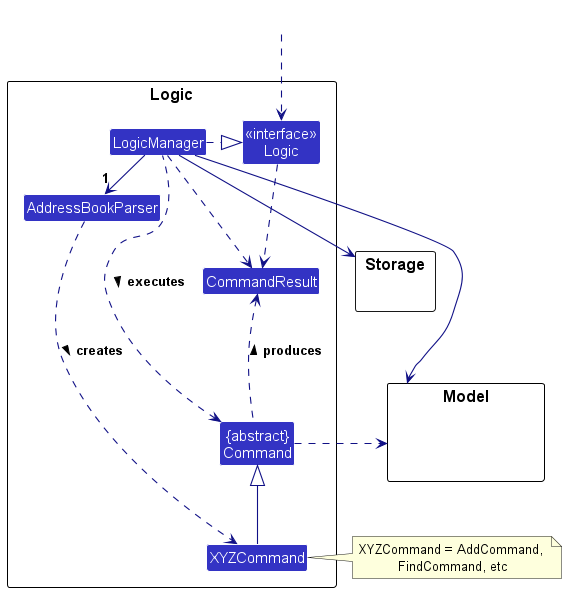
Here’s a (partial) class diagram of the Logic component:
The sequence diagram below illustrates the interactions within the Logic component, taking execute("delete 1") API call as an example.
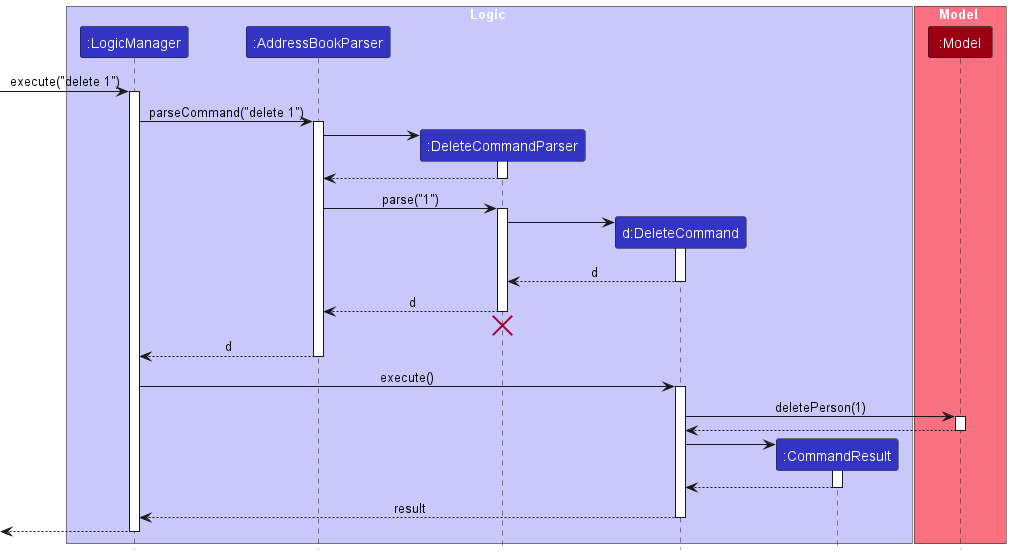
DeleteCommandParser should end at the destroy marker (X) but due to a limitation of PlantUML, the lifeline reaches the end of the diagram.
How the Logic component works:
- When
Logicis called upon to execute a command, it is passed to anAddressBookParserobject which in turn creates a parser that matches the command (e.g.,DeleteCommandParser) and uses it to parse the command. - This results in a
Commandobject (more precisely, an object of one of its subclasses e.g.,DeleteCommand) which is executed by theLogicManager. - The command can communicate with the
Modelwhen it is executed (e.g. to delete a person). - The result of the command execution is encapsulated as a
CommandResultobject which is returned fromLogic.
Here are the other classes in Logic (omitted from the class diagram above) that are used for parsing a user command:

How the parsing works:
- When called upon to parse a user command, the
AddressBookParserclass creates anXYZCommandParser(XYZis a placeholder for the specific command name e.g.,AddCommandParser) which uses the other classes shown above to parse the user command and create anXYZCommandobject (e.g.,AddCommand) which theAddressBookParserreturns as aCommandobject. - All
XYZCommandParserclasses (e.g.,AddCommandParser,DeleteCommandParser, …) inherit from theParserinterface so that they can be treated similarly where possible e.g, during testing.
Model component
API : Model.java
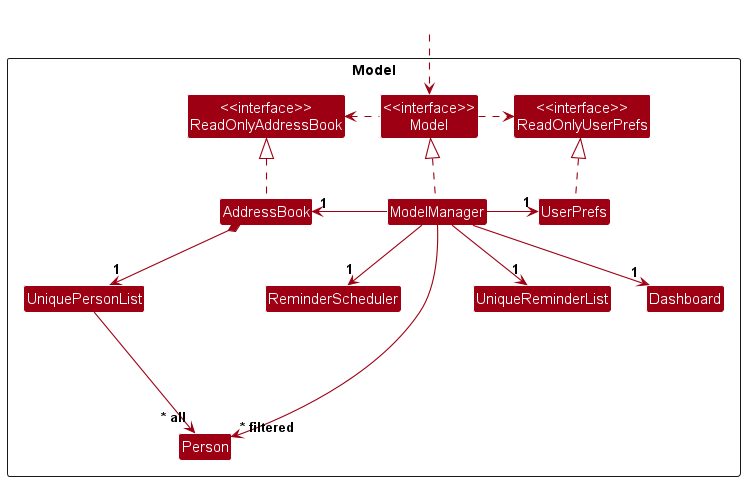
The Model component,
- stores the address book data i.e., all
Personobjects (which are contained in aUniquePersonListobject). - stores the currently ‘selected’
Personobjects (e.g., results of a search query) as a separate filtered list which is exposed to outsiders as an unmodifiableObservableList<Person>that can be ‘observed’ e.g. the UI can be bound to this list so that the UI automatically updates when the data in the list change. - stores a
UserPrefobject that represents the user’s preferences. This is exposed to the outside as aReadOnlyUserPrefobject. - stores a
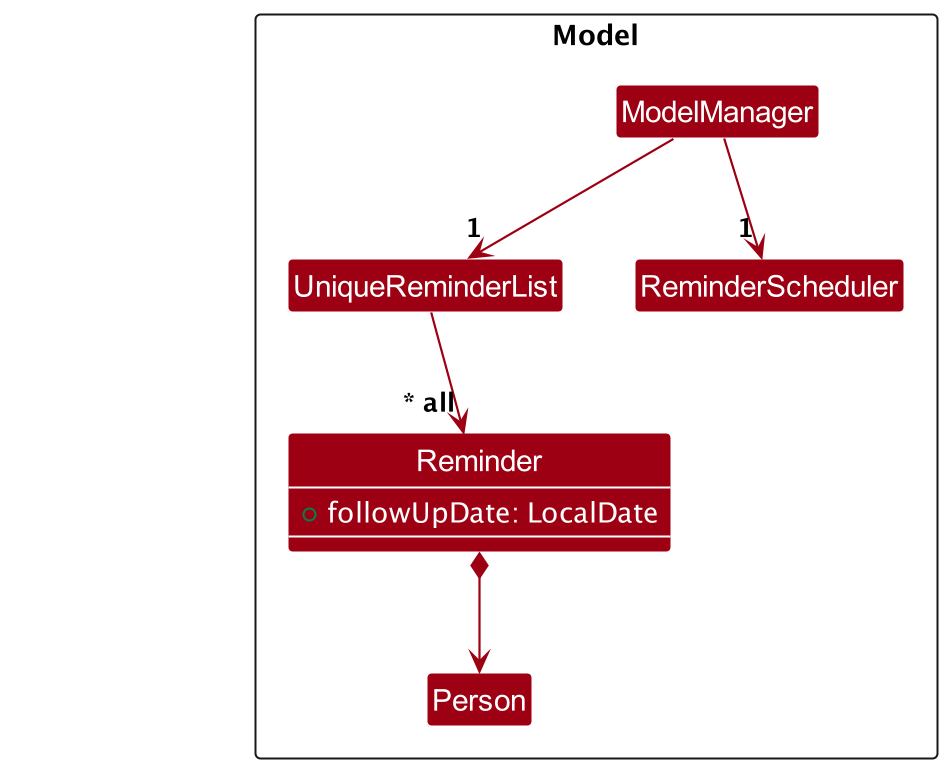
UniqueReminderListobject that represents the reminders and aReminderSchedulerthat periodically updates the reminders. This is exposed to the outside as aReadOnlyReminderListobject. - stores a
Dashboardobject that represents the statistics of the address book. - does not depend on any of the other three components (as the
Modelrepresents data entities of the domain, they should make sense on their own without depending on other components)
Person objects in the AddressBook. It also has a Tag list in the AddressBook, which Person references. This allows AddressBook to only require one Tag object per unique tag, instead of each Person needing their own Tag objects.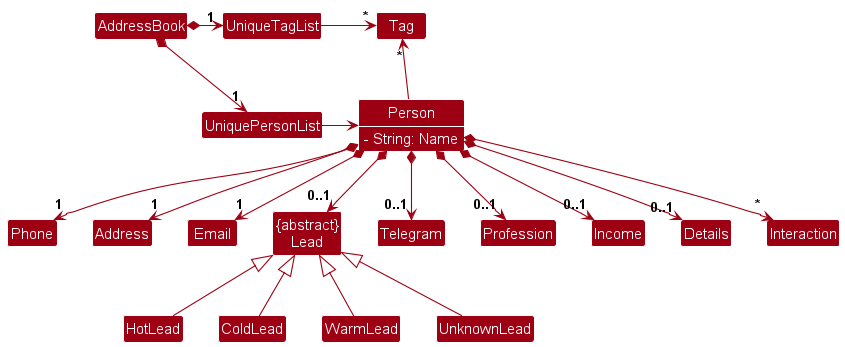
Storage component
API : Storage.java
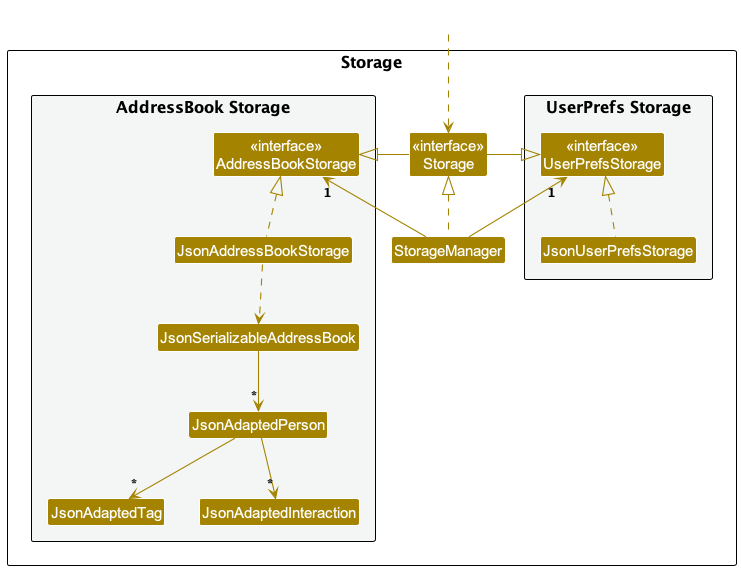
The Storage component,
- can save both address book data and user preference data in JSON format, and read them back into corresponding objects.
- inherits from both
AddressBookStorageandUserPrefStorage, which means it can be treated as either one (if only the functionality of only one is needed). - depends on some classes in the
Modelcomponent (because theStoragecomponent’s job is to save/retrieve objects that belong to theModel)
Common classes
Classes used by multiple components are in the seedu.addressbook.commons package.
Implementation
This section describes some noteworthy details on how certain features are implemented.
Interactions Feature
As a CRM software, taking notes of previous interactions with customers as well as their different outcomes is one of the most important features. It will allow the user to keep track of the progress of their interactions with their customers and help them to better plan their future interactions with them.
This section will describe in detail the current implementation and design considerations of the interactions feature.
Current Implementation
The Interaction feature is implemented using the Interaction class. A Person has a list of interactions and interactions have the following fields:
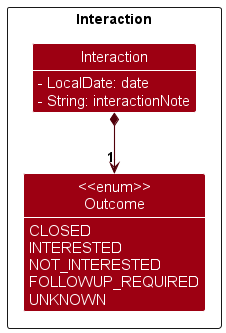
InteractionNote will store the details of the interaction.
Outcome is an Enumeration used to store the outcome of the interaction.
There is also a date field to store the date of the interaction. This is set to the current date when the interaction is created.
When the user executes the interaction command, an Interaction is created and added to the Person’s list of interactions. The new Interaction is then displayed in the PersonCard automatically.
Interactions play a key role in the reminder feature, recall that a follow-up is made X weeks after the last interaction. The Interaction class has a getFollowUpDate() method that is used to calculate the date of the next follow-up for the Person. It does this by getting the latest interaction date and adding the follow-up period of the Person to it.
Dashboard View
The dashboard shows statistics of the user’s client interactions, as well as upcoming follow-ups with clients. The dashboard view is a separate view that is mutually exclusive with the client view. The user can switch between the two views by entering the list and dashboard commands.
Current Implementation
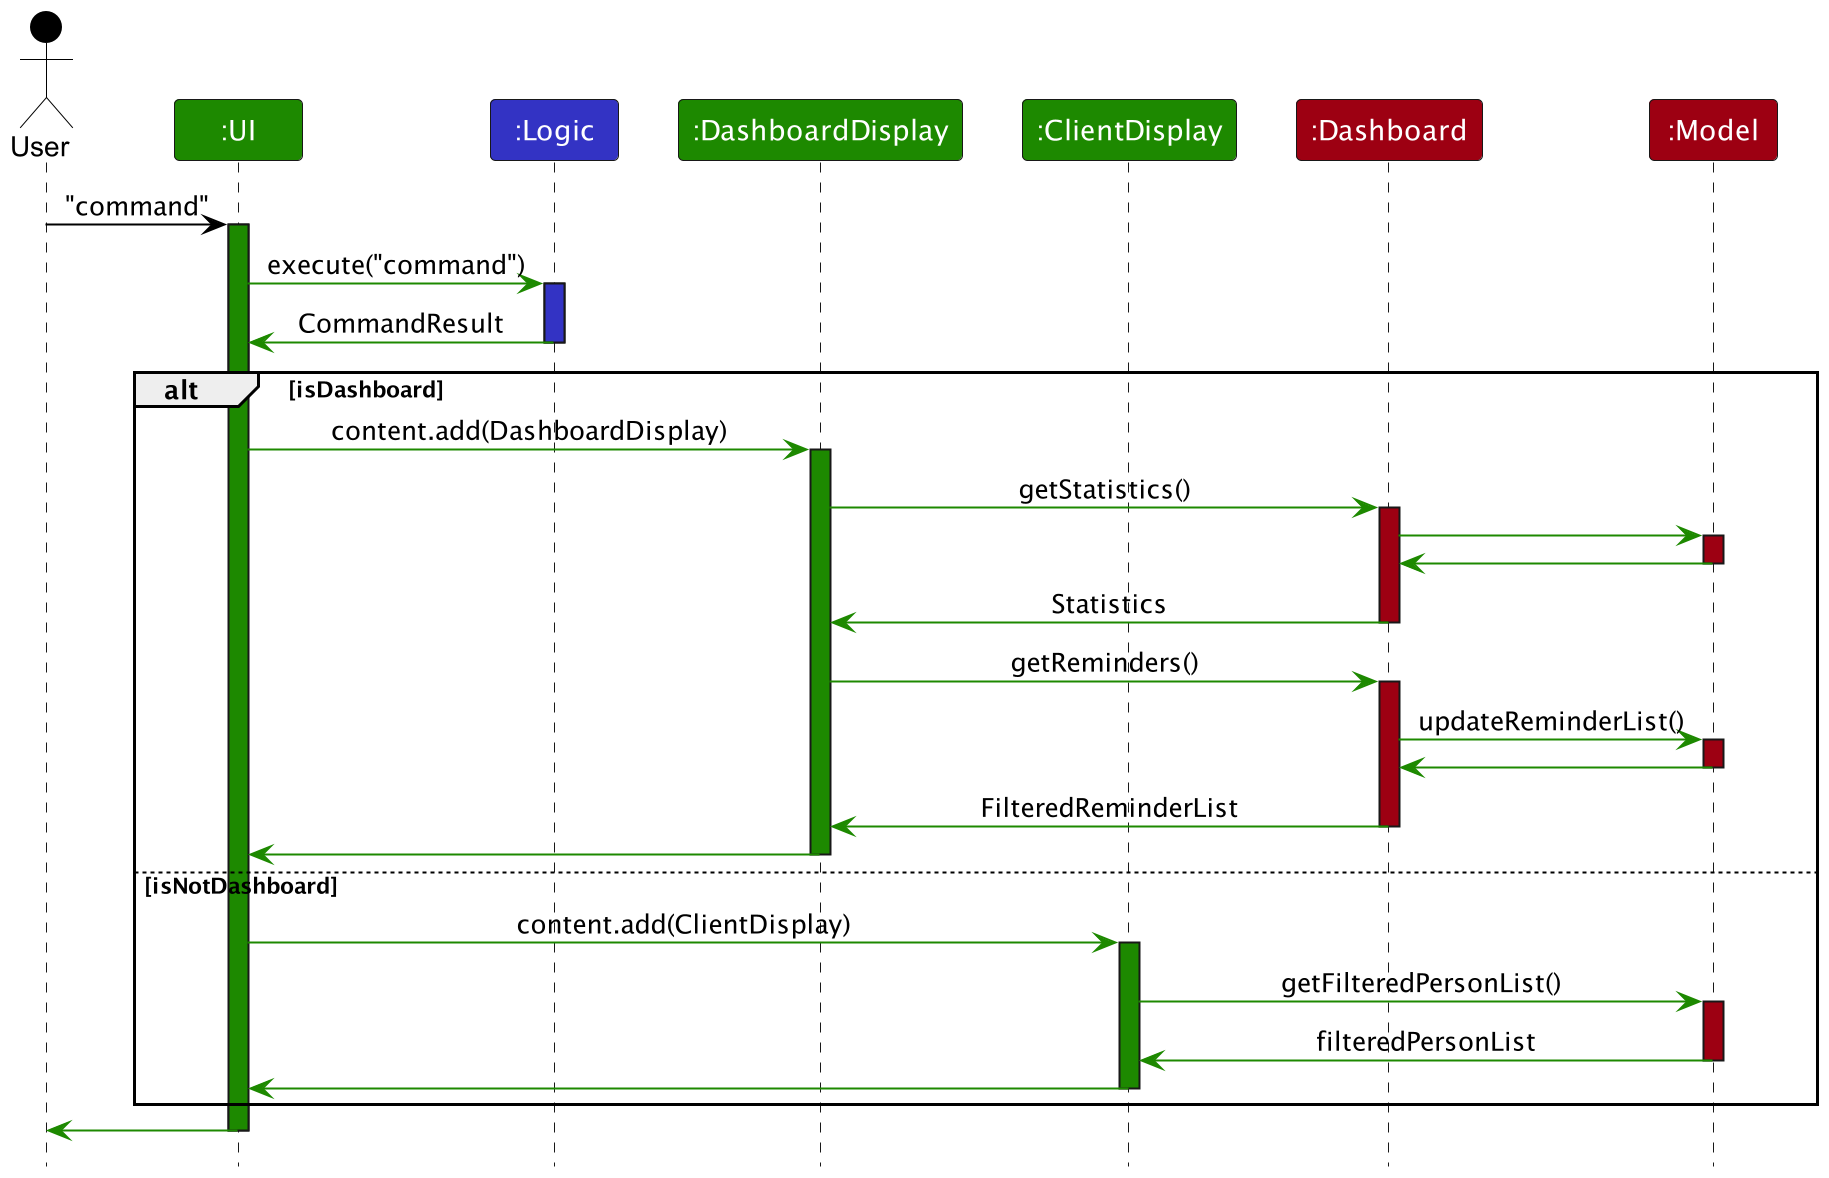
The currently active view is managed by the MainWindow class. Depending on the showDashboard flag of the last CommandResult, the MainWindow will display either the DashboardDisplay or ClientDisplay object. By default, i.e. on launch, the dashboard view is shown first.
Statistics shown on the dashboard currently include the following:
- Breakdown of clients by interaction outcome
-
Uncontacted: clients that have no interactions yet -
Contacting: clients that have at least one non-closing interaction (outcome is notCLOSED) -
Closed: clients that have at least one closing interaction (outcome isCLOSED)
-
- Average number of interactions per client
- Proportion of interactions by outcome
- Number of clients by lead category (hot, warm, cold)
The dashboard also shows the upcoming follow-ups with clients. The follow-ups are separated by date, sorted from earliest to latest. The follow-up date is calculated using the client’s lead and the date of the latest interaction, see Reminders for more details.
All data for statistics and follow-ups are retrieved from the Dashboard component.
The following sequence diagram shows how the dashboard feature is currently implemented.
Design Considerations
Currently, the dashboard only shows static data at a specific state in time. To achieve perceived dynamics, any command that modifies the client list will switch the view to the client view. This is managed using the showDashboard flag mentioned previously. This will only work if there is only one instance of Connectify running at any time. If the data is modified from another instance of Connectify, the dashboard view will not be updated in real-time.
To achieve real-time updates, we will need to implement a mechanism to track changes to the client data and trigger the dashboard to update accordingly. However, this leads to another problem, which is the performance of the dashboard.
As the amount of client data increases, the calculation of statistics and follow-ups may increase significantly. Therefore, the dashboard should be updated, and the statistics and reminders data recalculated, only when the dashboard view is shown, and data has been modified.
The Dashboard component already has an isDashboardDirty flag to indicate if the dashboard data needs to be recalculated. However, due to time constraints, it is currently always set to true and not being used to track data changes to the client data. In the future, we can track changes to this flag, e.g. using observers, and update the dashboard accordingly.
Viewing a client’s full profile
As we add more attributes and interactions with clients, we will need a better way to view all of the information associated with a client. Therefore instead of displaying all information in a PersonCard within the list of clients, we will need a new component to display the client profile in a better way.
Current Implementation
The new ClientProfilePanel UI component is the replacement for displaying client profiles. Besides the required and optional fields, the user can also see all of their past interactions with the client.
The UI components use the observer pattern. The active client profile to display is tracked using a SimpleObjectProperty inside a Model. Since a SimpleObjectProperty is an ObservableValue, we can add listeners to its change event and update our UI whenever the currently selected profile changes.
We currently support 2 ways of manually selecting a client’s profile to view:
- By clicking on a client’s card from the client list
- By using the
viewcommand
Both methods will update the currently selected client, which will then trigger a listener to update the UI to show the profile panel.
In addition, any command that modifies a client’s data (e.g. interaction, edit etc.) will also cause that client’s profile to be set to active and shown.
To exit out of the profile view, the user can enter the list command, which will hide the profile panel and restore the client list to occupy the full window width.
Reminders
Current Implementation
The Reminder mechanism is facilitated by Reminder and UniqueReminderList as shown below
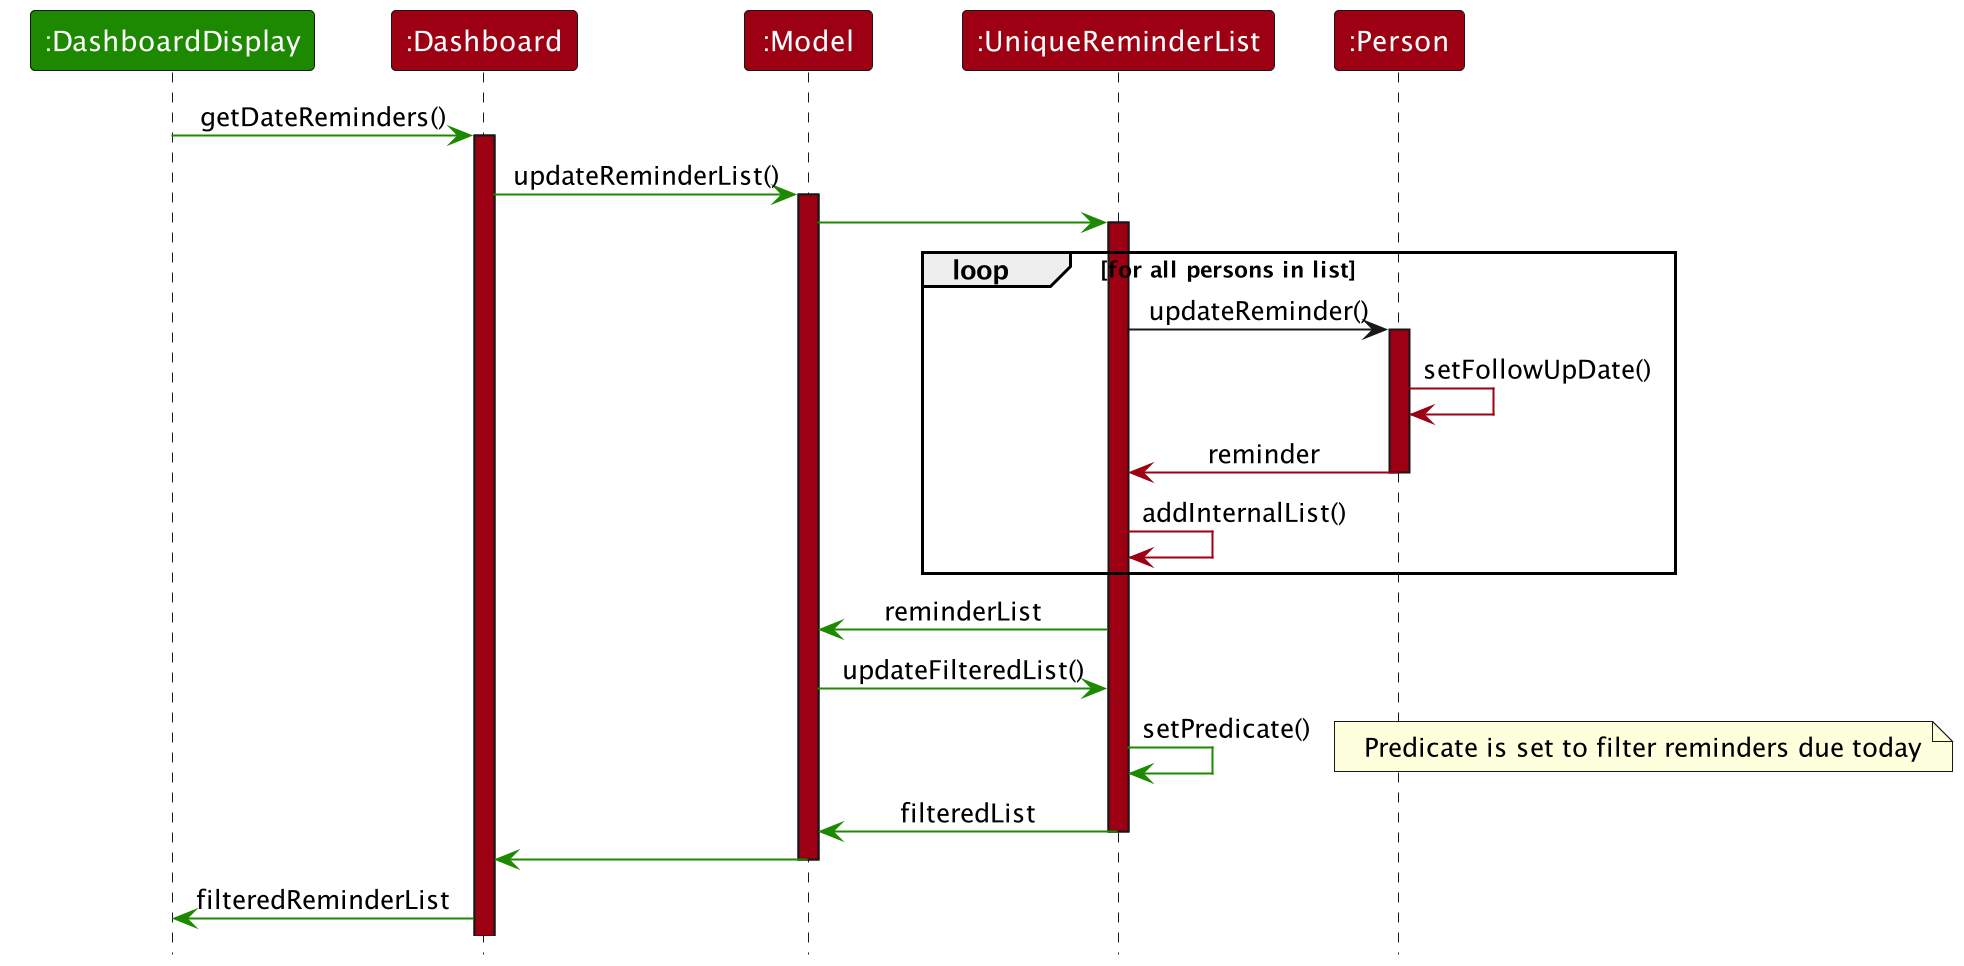
Step 1. The user launches the application and the User’s data such as interactions and leads are loaded. Reminder is derived from the Person.lead and Person.interactions data, with the Reminder date being X + the date of the latest Interaction, and X is dependant on the Lead’s LeadCategory. This initial list of Reminder will be stored in the UniqueReminderList.
Step 2. The user executes interaction 1 o/INTERESTED Thinking of giving it a shot command to add an interaction to the 1st person in the address book. The Reminder should later be updated to the latest Interaction date + X. Note this change should also happen when EditCommand is executed since the Person.lead or Person.name might have been changed.
Step 3. When displaying the Reminder’s, the UniqueReminderList will then be updated and should be sorted by date, and the Reminder that is due the soonest should be displayed first.
Step 4. UniqueReminderList should also be updated daily with ReminderScheduler class. This will ensure that if the user leaves the dashboard open for prolonged periods, the reminders will be able to sync up to account for the time passed
Design considerations:
Aspect: How Reminders executes:
-
Alternative 1 (current choice): Updates the reminderList only when the dashboard is being viewed
- Pros: No need to update every single time a command is executed, increasing performance
- Cons: In the future, if we want to stay on the dashboard view when other commands are executed, we would require the setting of the “DirtyFlag” to update the reminderList
-
Alternative 2: Updates Reminders when commands are executed
- Pros: Reminders will always be up to date
- Cons: Will require more processing power and might slow down the application
Edit Single field Macro feature
Keying in the edit command can be a little tedious to use especially if the user only want to edit a single field of a client profile. The edit single field is a macro to edit a single field of a client profile. This command is special because its command word is the same as the field you want to edit.
Current Implementation
The proposed Edit Single field Macro mechanism is facilitated by AddressBookParser and EditCommandMacroParser
AddressBookParser contains an enum with the different person fields to expect as command words.
Then in its parseCommand method, if it is not another valid command word, it will check in the default if it is a valid person field by iterating through the enum. If it is, it will create a EditCommandMacroParser and pass the command to it through its constructor.
EditCommandMacroParser will then take in the input, and parse the index and the argument to the command without any prefix similar to the FindCommand. It will then create a EditCommand with only the commandWord changed to its single argument input and pass said EditCommand to the LogicManager to execute.
EditCommandMacroParser does the argument checking using ParseUtil commands to check if they are valid arguments. However other checks like whether it is a valid index or duplicated person is done by the EditCommand itself.
Design considerations:
This is a huge step up in terms of code efficiency as compared to creating a new command for each field.
Documentation, logging, testing, configuration, dev-ops
Appendix: Requirements
Product scope
Target user profile:
- needs to track information about business clients
- prefer desktop apps over other types
- can type fast
- prefers typing to mouse interactions
- is reasonably comfortable using CLI apps
Value proposition: manage useful information about clients faster than a typical mouse/GUI-driven app
User stories
Priorities: High (must have) - * * *, Medium (nice to have) - * *, Low (unlikely to have) - *
| Priority | As a … | I want to … | So that I can… |
|---|---|---|---|
* * * |
user | record my client’s contact information | conveniently refer to it later |
* * * |
user | access the full details of a particular client’s information comprehensively | aid my future interaction with this client |
* * * |
user | delete client profiles | remove entries that I no longer need |
* * |
user | edit client profiles | record any changes in my client’s information |
* * |
user | add notes of my meetings with my clients | track details for future interactions with my client |
* * |
user | log the outcomes of my client interactions (e.g. interested, not interested, follow-up required) | track progress of client interactions |
* * |
user | mark a client as a “hot lead”, “warm lead” or “cold lead” | gauge the sales potential of the client |
* * |
new user | have example client data already present in the app | have a reference or play around in the app to get familiar with it |
* * |
salesperson | view analytics about my performance | continually improve |
* * |
salesperson | look at a summary of what’s coming up next | plan my day around them |
Use cases
(For all use cases below, the System is the Connectify and the Actor is the user, unless specified otherwise)
For each use case, “User is in client view” means an expectation that user has already executed the list command and is viewing the list of clients. However the user could be in the dashboard view, in this case the command will still work, but as an additional step, the user will be redirected to the client view after the command finishes executing.
To enter the client view see Use case UC01:
Use case: UC01 - Enter client view
MSS
- User opens the app and is in dashboard view
- User requests to enter client view
-
Connectify shows the client view
Use case ends.
Use case: UC02 - Delete a client
MSS
- User is in client view
- User requests to delete a specific client in the list
-
Connectify deletes the client
Use case ends.
Extensions
-
2a. The list is empty.
Use case ends.
-
2b. The given index is invalid.
-
2b1. AddressBook shows an error message.
Use case resumes at step 1.
-
Use case: UC02 - Add a client interaction
MSS
- User is in client view
- User requests create a client interaction
-
Connectify adds the interaction to the client profile
Use case ends.
Extensions
-
2a. The user does not exist.
-
2a1. Connectify shows an error message.
Use case resumes at step 1.
-
-
2b. The entered client interaction is invalid
-
2b1. Connectify shows an error message.
Use case resumes at step 1.
-
Use case: UC03 - Edit a client’s profile
Guarantees:
- The client’s profile will be updated only if the command is executed successfully.
MSS
- User is in client view
- User requests to edit a client’s profile
-
Connectify shows the updated client’s profile
Use case ends.
Extensions
-
2a. The user does not exist.
-
2a1. Connectify shows an error message.
Use case resumes at step 1.
-
-
2b. The edited fields are invalid
-
2b1. Connectify shows an error message.
Use case resumes at step 1.
-
Use case: UC04 - View a client’s full profile
MSS
- User is in client view
- User requests to view a client’s full profile
-
Connectify shows the client’s full profile
Use case ends.
Extensions
-
2a. The user does not exist.
-
2a1. Connectify shows an error message.
Use case resumes at step 1.
-
Use case: UC05 - Mark a client as “Cold”, “Warm” or “Hot” Leads
Guarantees:
- The client’s profile will be updated only if the command is executed successfully.
MSS
Very similar to UC03, the difference being that only the lead field is updated only if the entered field is a valid lead.
Use case: UC06 - View dashboard analytics
MSS
- User is in client view
- User requests to view dashboard analytics
-
Connectify shows the dashboard analytics
Use case ends.
Use case: UC07 - View Help
MSS
- User requests to view help
-
The help window is shown
Use case ends.
Use case: UC08 - Find a client
MSS
- User is in client view
- User requests to find a client
-
Connectify filters the address book list to show only clients that match the search query
Use case ends.
Use case: UC09 - Clear the address book
MSS
- User is in client view
- User requests to clear the address book
-
Connectify clears the address book
Use case ends.
Non-Functional Requirements
- Should work on any mainstream OS as long as it has Java
11or above installed. - Should be able to hold up to 1000 persons without a noticeable sluggishness in performance for typical usage.
- A user with above-average typing speed for regular English text (i.e. not code, not system admin commands) should be able to accomplish most of the tasks faster using commands than using the mouse.
- The system should work in both 32-bit and 64-bit environments.
- Response time for fetching a contact’s details should not exceed 1.5 seconds.
- Search operations should return results within 2 seconds for queries against the full dataset.
- The system must be backwards compatible with data generated from previous versions of the software.
Glossary
- Mainstream OS: Windows, Linux, Unix, OS-X
- Hot/Warm/Cold Lead: A hot lead is a potential client who is ready to buy. A warm lead is a potential client who is interested in buying. A cold lead is a potential client who is not ready to buy.
Appendix: Instructions for manual testing
Given below are instructions to test the app manually.
Launch and shutdown
-
Initial launch
-
Download the jar file and copy into an empty folder
-
Double-click the jar file or run
java -jar connectify.jarExpected: Shows the GUI with a set of sample clients.
-
-
Saving window preferences
-
Resize the window to an optimum size. Move the window to a different location. Close the window.
-
Re-launch the app by double-clicking the jar file.
Expected: The most recent window size and location is retained.
-
-
Saving client data
-
Run a simple command like
listor acreatecommand. All client data should be automatically saved. -
Close the app, and re-launch. All client data from the previous session should be retained.
-
Deleting a person
-
Deleting a person while all persons are being shown
-
Prerequisites: List all persons using the
listcommand. Multiple persons in the list. -
Test case:
delete 1Expected: First contact is deleted from the list. Details of the deleted contact shown in the status message. Timestamp in the status bar is updated.
-
Test case:
delete 0Expected: No person is deleted. Error details shown in the status message. Status bar remains the same.
-
Other incorrect delete commands to try:
delete,delete x,...(where x is larger than the list size)Expected: Error details shown in the status message.
-
Creating a person
-
Create a person using the
createcommand.- Test case:
create n/Bernice Yu p/99272758 e/berniceyu@example.com
a/Blk 30 Lorong 3 Serangoon Gardens, #07-18 t/colleagues
t/friends tg/@yuyubern pf/Graphic Designer i/60000
Expected: The new client should be created in your client list.
- Test case;
 create n/Bernice Yu e/berniceyu@example.com
 a/Blk 30 Lorong 3 Serangoon Gardens, #07-18 t/colleagues
 t/friends tg/@yuyubern pf/Graphic Designer i/60000
Expected: Client should not be created. Error details shown in the output window. Compulsory fields like
phoneshould be specified. - Test case;
 create n/Bernice Yu p/99272758 e/berniceyu@example.com
 a/Blk 30 Lorong 3 Serangoon Gardens, #07-18
Expected: The new client should be created in your client list. Client should be able to be created even if optional fields are not specified.
- Test case:
Saving data
-
Dealing with missing data files
- The app should start up as usual, with a new set of sample data.
-
Dealing with corrupted data files
- The app should start with an empty client list. Remove the corrupted
addressbook.jsondata file, and the app will automatically generate a new sample client list on the next start-up.
- The app should start with an empty client list. Remove the corrupted
Appendix: Planned Enhancements
Due to time and resource constraints, we were unable to implement all the features we wanted to. This section will describe some of the more essential features that could be implemented in the future.
- Follow-up reminders are currently implemented as a one-time event. If a follow-up for a client has been missed, it will not be added to the dashboard again. We plan to implement recurring reminders that will be added to the dashboard again if they have been missed.
- Currently, the content in the dashboard is only updated when the user switches to the dashboard view. In the future, we will be implementing a mechanism to track changes to the client data, and trigger the dashboard to update accordingly. This will allow the dashboard to be updated in real-time.
- All user data is currently stored in a fixed location
data/addressbook.json. We plan to implement a feature that allows the user to specify a custom location to store their data. - Currently, the user can only edit one client at a time. We plan to implement batch editing so that the user can edit common fields across multiple clients at once. The command syntax will be similar to the current
editcommand, but allowing multiple indices to be specified, e.g.edit 1 2 3 l/HOT. - There is currently no way to import or export client data. In the future, we will support importing and exporting their data in various formats, such as CSV.
- The client list currently only has one fixed order. We plan to implement a feature that allows the user to sort the client list by different fields, such as name, lead category, etc. The command will be in the form of
sort FIELD [ASC|DESC]. - The
clearcommand does not have any confirmation. We plan to implement a confirmation dialog to prevent accidental deletion of data. - Our app works best at a medium to large window size. Resizing the window to a smaller size will cause the UI to break. We plan to implement a responsive UI that will work well at any window size.
- The app currently shows the dashboard view on launch. New users may not be familiar with how to switch to the client view. We plan to implement a welcome screen that will guide new users on how to use the app.
- Currently, the app only supports one instance at a time. Making changes to the data from another instance of the app will not be reflected in real-time. We plan to implement a feature that allows multiple instances of the app to run concurrently.
Appendix: Effort
Connectify was our take on a customer relations manager (CRM) software built on the existing AB3 system. Due to the added context, changes were made regarding the management and storage of information within and across components to ensure we follow Object-Oriented Programming (OOP) and Design Patterns. Furthermore, due to the added coupling of the systems such as the Reminders and Dashboard, we had major changes that we had to make to Model and Logic while seeking out best design practices. The Dashboard was also an entirely new window on its own, with its classes for handling the Logic as well as the UI. Additionally, we were committed to building the app using a minimalistic approach, only adding classes that were required and writing clean and effective code.
Here are some other features that we implemented that were challenging:
-
create,edit: These commands required additional fields which we handled through the use ofPersonBuilderthat allowed for optional fields to be added more easily. -
view: At first glance, viewing a client’s profile seemed straightforward to implement. However, we also had to consider how to track the currently selected client and how to update the UI accordingly. We also had to consider how to handle the case where the user is viewing the dashboard and wants to view a client’s profile, and what should be shown when the user edits a client profile. We decided to use an observable to track the currently selected client and add a listener to update the UI whenever the selected client changes. -
dashboard: Since theDashboardclass handles both statistics and reminders, it needs to be able to fetch the updated data from both models. However, to prevent the UI components from being coupled with the model components, we had to extend theLogicclass to allow for theDashboardto fetch the required data. In addition, in order to control which view (dashboard or client) is shown, we considered several alternatives and decided that using a flag inCommandResultis the most straightforward to implement. -
Interaction:Interactionswas a whole different class on its own which handled outcomes, notes and dates. This was a new class that also had to be created with Reminders as well as dashboards in mind. -
reminders: Reminders were hard to implement because of the dependence onPersonandLead. While we refer to past year’s team’s implementation as a reference for the design, the logic behind the list and the scheduler was something that we had to figure out on our own. We also had to deal with how and when to update the reminderList, which proved tedious because of the singleton pattern. Furthermore, with our added dashboard and a class to handle the logic on its own, we had to integrate the whole system to ensure that the reminders were updated whenever the dashboard was being called.
We estimate a 30% increase in base features from the base AB3 system. This is due to the added features such as reminders and dashboard as well as interactions which increased the complexity of the relationship with the other components.