User Guide
Welcome to Connectify!

Connectify is a desktop app for managing clients, optimized for use via a Command Line Interface (CLI). Connectify helps salespersons manage their clients information records and data, boosting their efficiency in building customer relationships! If you can type fast, Connectify can get your client management tasks done faster than traditional GUI apps.
In this user guide, you will find instructions on how to install Connectify and use its many features to manage your clients.
Choose a topic from the table of contents to find out how to manage your clients using Connectify!
Table of Contents
- Welcome to Connectify!
- Table of Contents
- Quick start
- If you’re new: what are commands?
- Glossary
- Graphical User Interface Components
- Features
- Miscellaneous Notes
- FAQ
- Known Issues
- Command summary
Quick start
-
Ensure that you have Java 11 installed on your Computer.
-
Download the latest
connectify.jarfrom our releases. -
Copy the file over to the folder you would want to use as the home folder for Connectify. An option is to create a folder named
Connectifyin yourDesktopand place the file there. -
Open the command terminal.
a. For Windows, you can open
Command Promptfrom your list of installed applications.b. For macOS and other operating systems, open the
Terminalapp. -
Change the directory of the terminal by using the
cdcommand.a. For example, if you saved your file at
C:\Users\John\Desktop\Connectify\connectify.jar, run the commandcd C:\Users\John\Desktop\Connectifyin your terminal. -
Run
java -jar connectify.jarto start the application. -
A window similar to the one below should appear in a few seconds, containing sample data.
The GUI you see on start-up may be slightly different due to differences in data. -
Type the command in the command box and press
Enterto execute it.Some examples you can try:
-
list: Lists all client profiles. -
create n/John Doe p/98765432 e/johnd@example.com a/John street, block 123, #01-01: Creates a client namedJohn Doein the client list. -
delete 3: Deletes the 3rd contact currently shown in the displayed client list. -
exit: Exits the app.
-
-
Refer to Features below for more commands and details for each command.
If you’re new: what are commands?
Commands are the string of text you type into the command box. They usually start with a command word.
- e.g.
create n/John Doe p/98765432 e/johnd@example.com a/John street, block 123, #01-01is a command. create is the command word.
Sometimes these commands require additional information. When creating our client, we need to specify the name, phone number, etc. These fields are called parameters.
Parameters are additional information to be supplied by the user.
- e.g. In
n/NAME,NAMEis a parameter which can be used asn/John Doe.
For most commands, parameters are prefixed by flags. They are indicators to differentiate various parts of the command. They consist of a letter, followed by a /.
- e.g. In
n/NAME,n/is the flag for theNAMEparameter.
Glossary
This section contains a list of terms used in this user guide. Feel free to refer back to this section if you are unsure of what a term means!
- Command Line Interface (CLI): A type of user interface where the user types in commands to interact with the application.
- Graphical User Interface (GUI): A user interface that allows users to interact with through graphical icons like buttons.
- Commands: The string of text you type into the command box. They usually start with a command word. Read more about it here.
- Parameters: Additional information to be supplied by the user into commands.
-
Flags: Indicators to differentiate various parts of the command. They consist of a letter, followed by a
/. For example,n/is the flag for theNAMEparameter. - Hot/Warm/Cold Lead: A client’s lead represents their likelihood of becoming a customer. Hot leads represent a customer with high potential, and cold leads represent a customer with low potential.
- Dashboard: Connectify’s view that displays a summary of your client interactions and important follow-ups. Find out more about Connectify’s dashboard here.
- Follow-up: A meeting with a client to follow up on their interest in your product. You can find out about how Connectify calculates follow-up dates here.
-
Interaction Outcome: The outcome of an interaction/meeting. This indicates the success of an interaction and how likely a deal can be closed.
- Closed: The client has bought your product and the deal has been closed.
- Interested: Indicates that the client is interested in your product, but has some hesitations before buying.
- Not interested: Client is not interested despite best efforts.
- Unknown: All other categories of outcomes that do not fall into the above mentioned categories. For example, the client is going through family mourning, which is not a good time to talk about the product.
Graphical User Interface Components
Let’s first discuss the top half of the interface.
-
Navigation Bar
- File: a dropdown menu containing the exit button, which quits the application.
- Help: a dropdown menu containing the help button, which provides the link to this user guide.
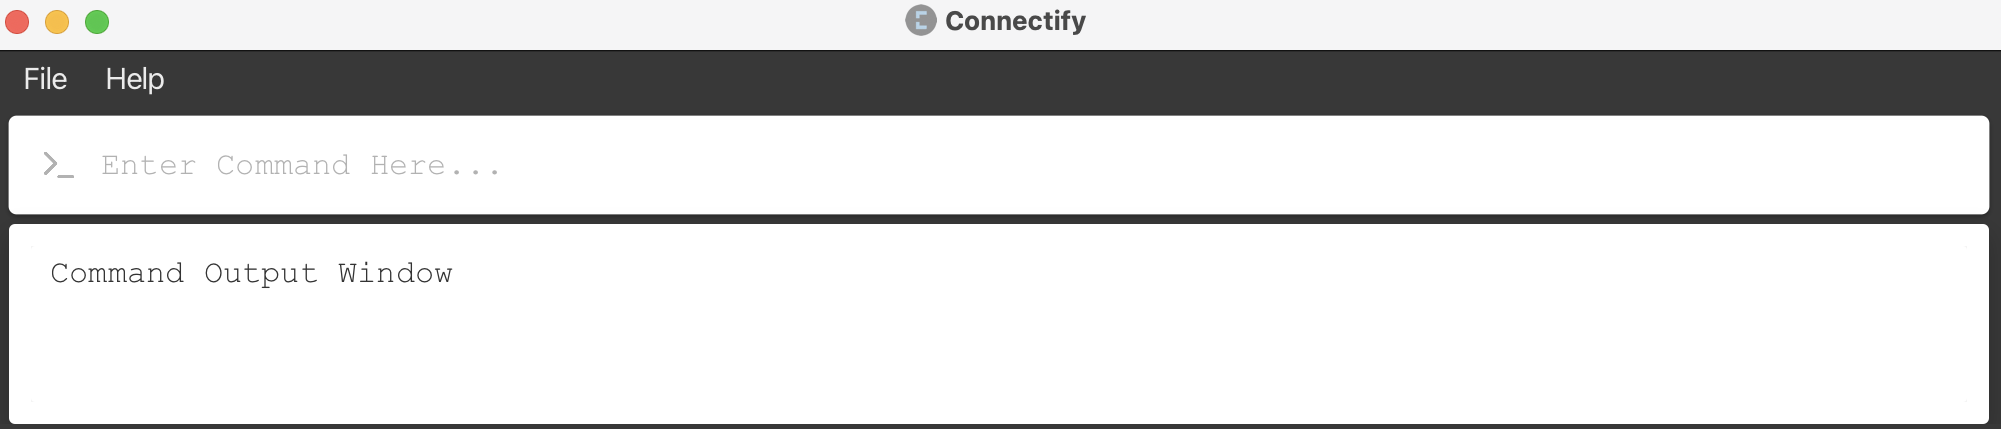
-
Command Box: a box where you can type commands. When it is empty, it prompts you with
Enter Command Here.... - Output Window: a box where the results of your commands will be displayed. Any errors that arise will also be shown here.
This is Connectify’s dashboard view. By default, this view is shown on start-up. However, if you are on another view, you can switch to the dashboard view using the dashboard command.
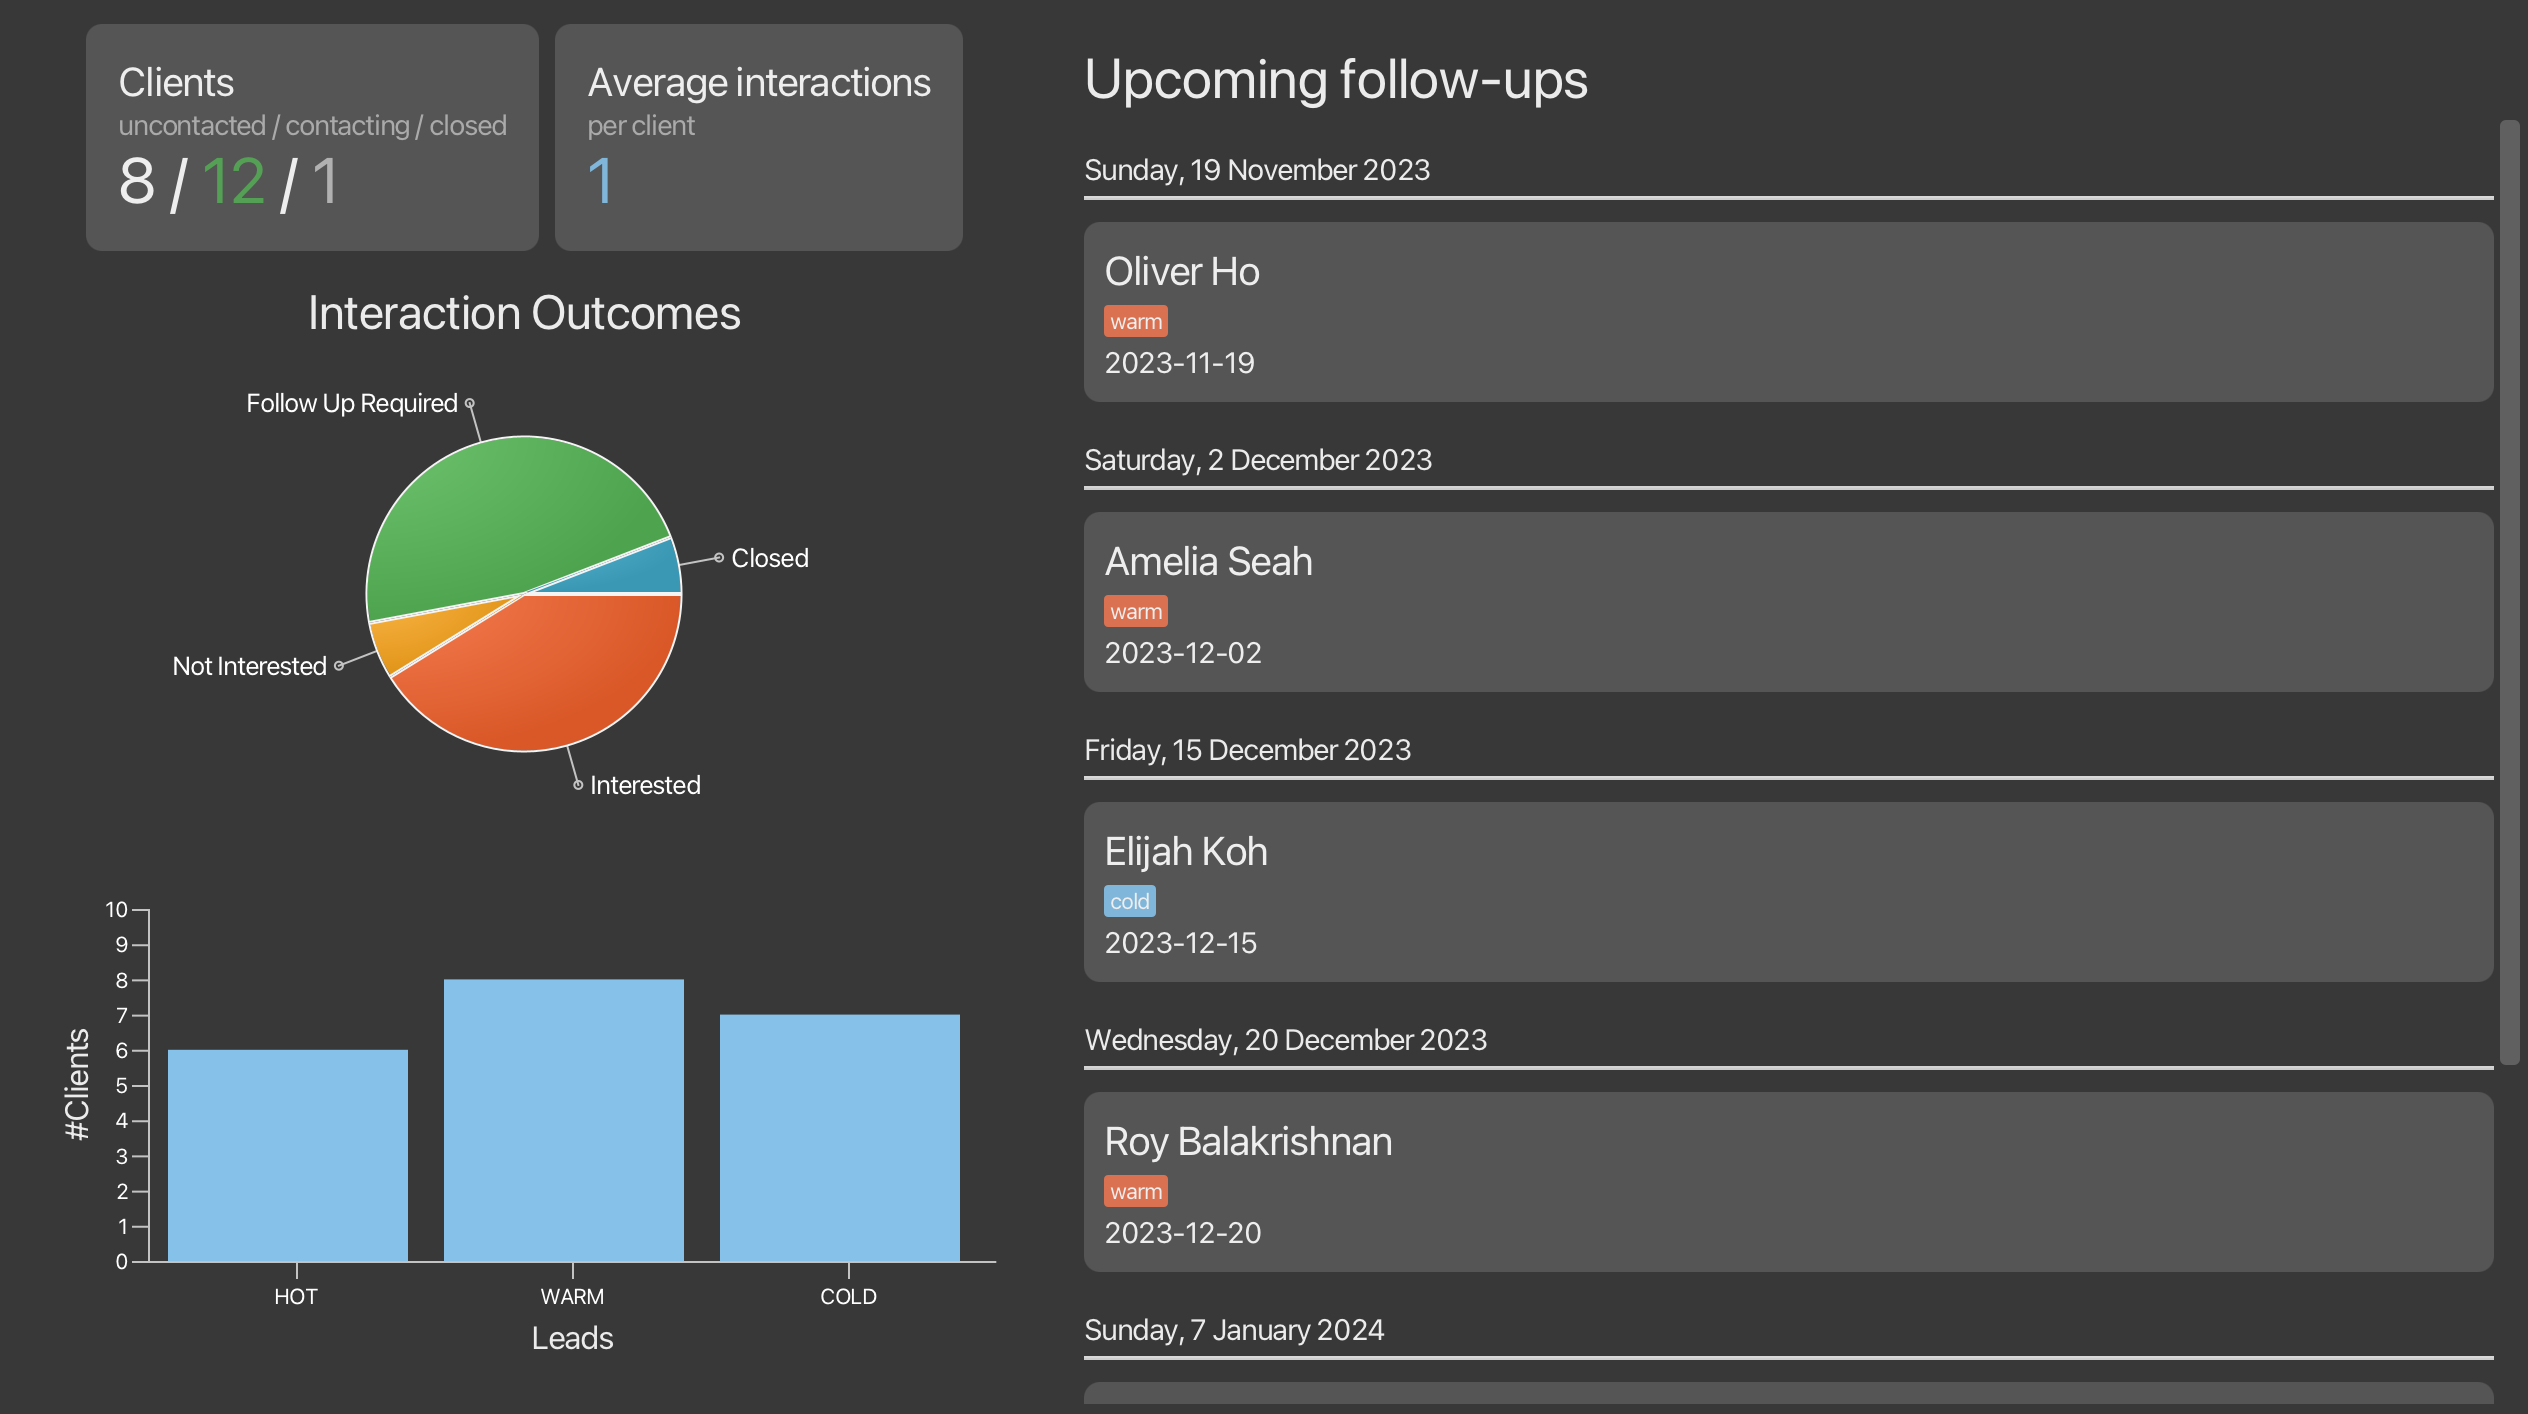
-
Connectify’s Analytics: insightful statistics that are automatically calculated for you. This includes:
- Number of uncontacted / contacted / closed clients
- Average interactions among all clients
- Breakdown of the different interaction outcomes
- Number of hot / warm / cold leads
- Upcoming Follow-ups: upcoming meetings for each client. Follow-up dates are determined automatically by the latest interaction date and the lead of the client. See how Connectify calculates follow-up dates.
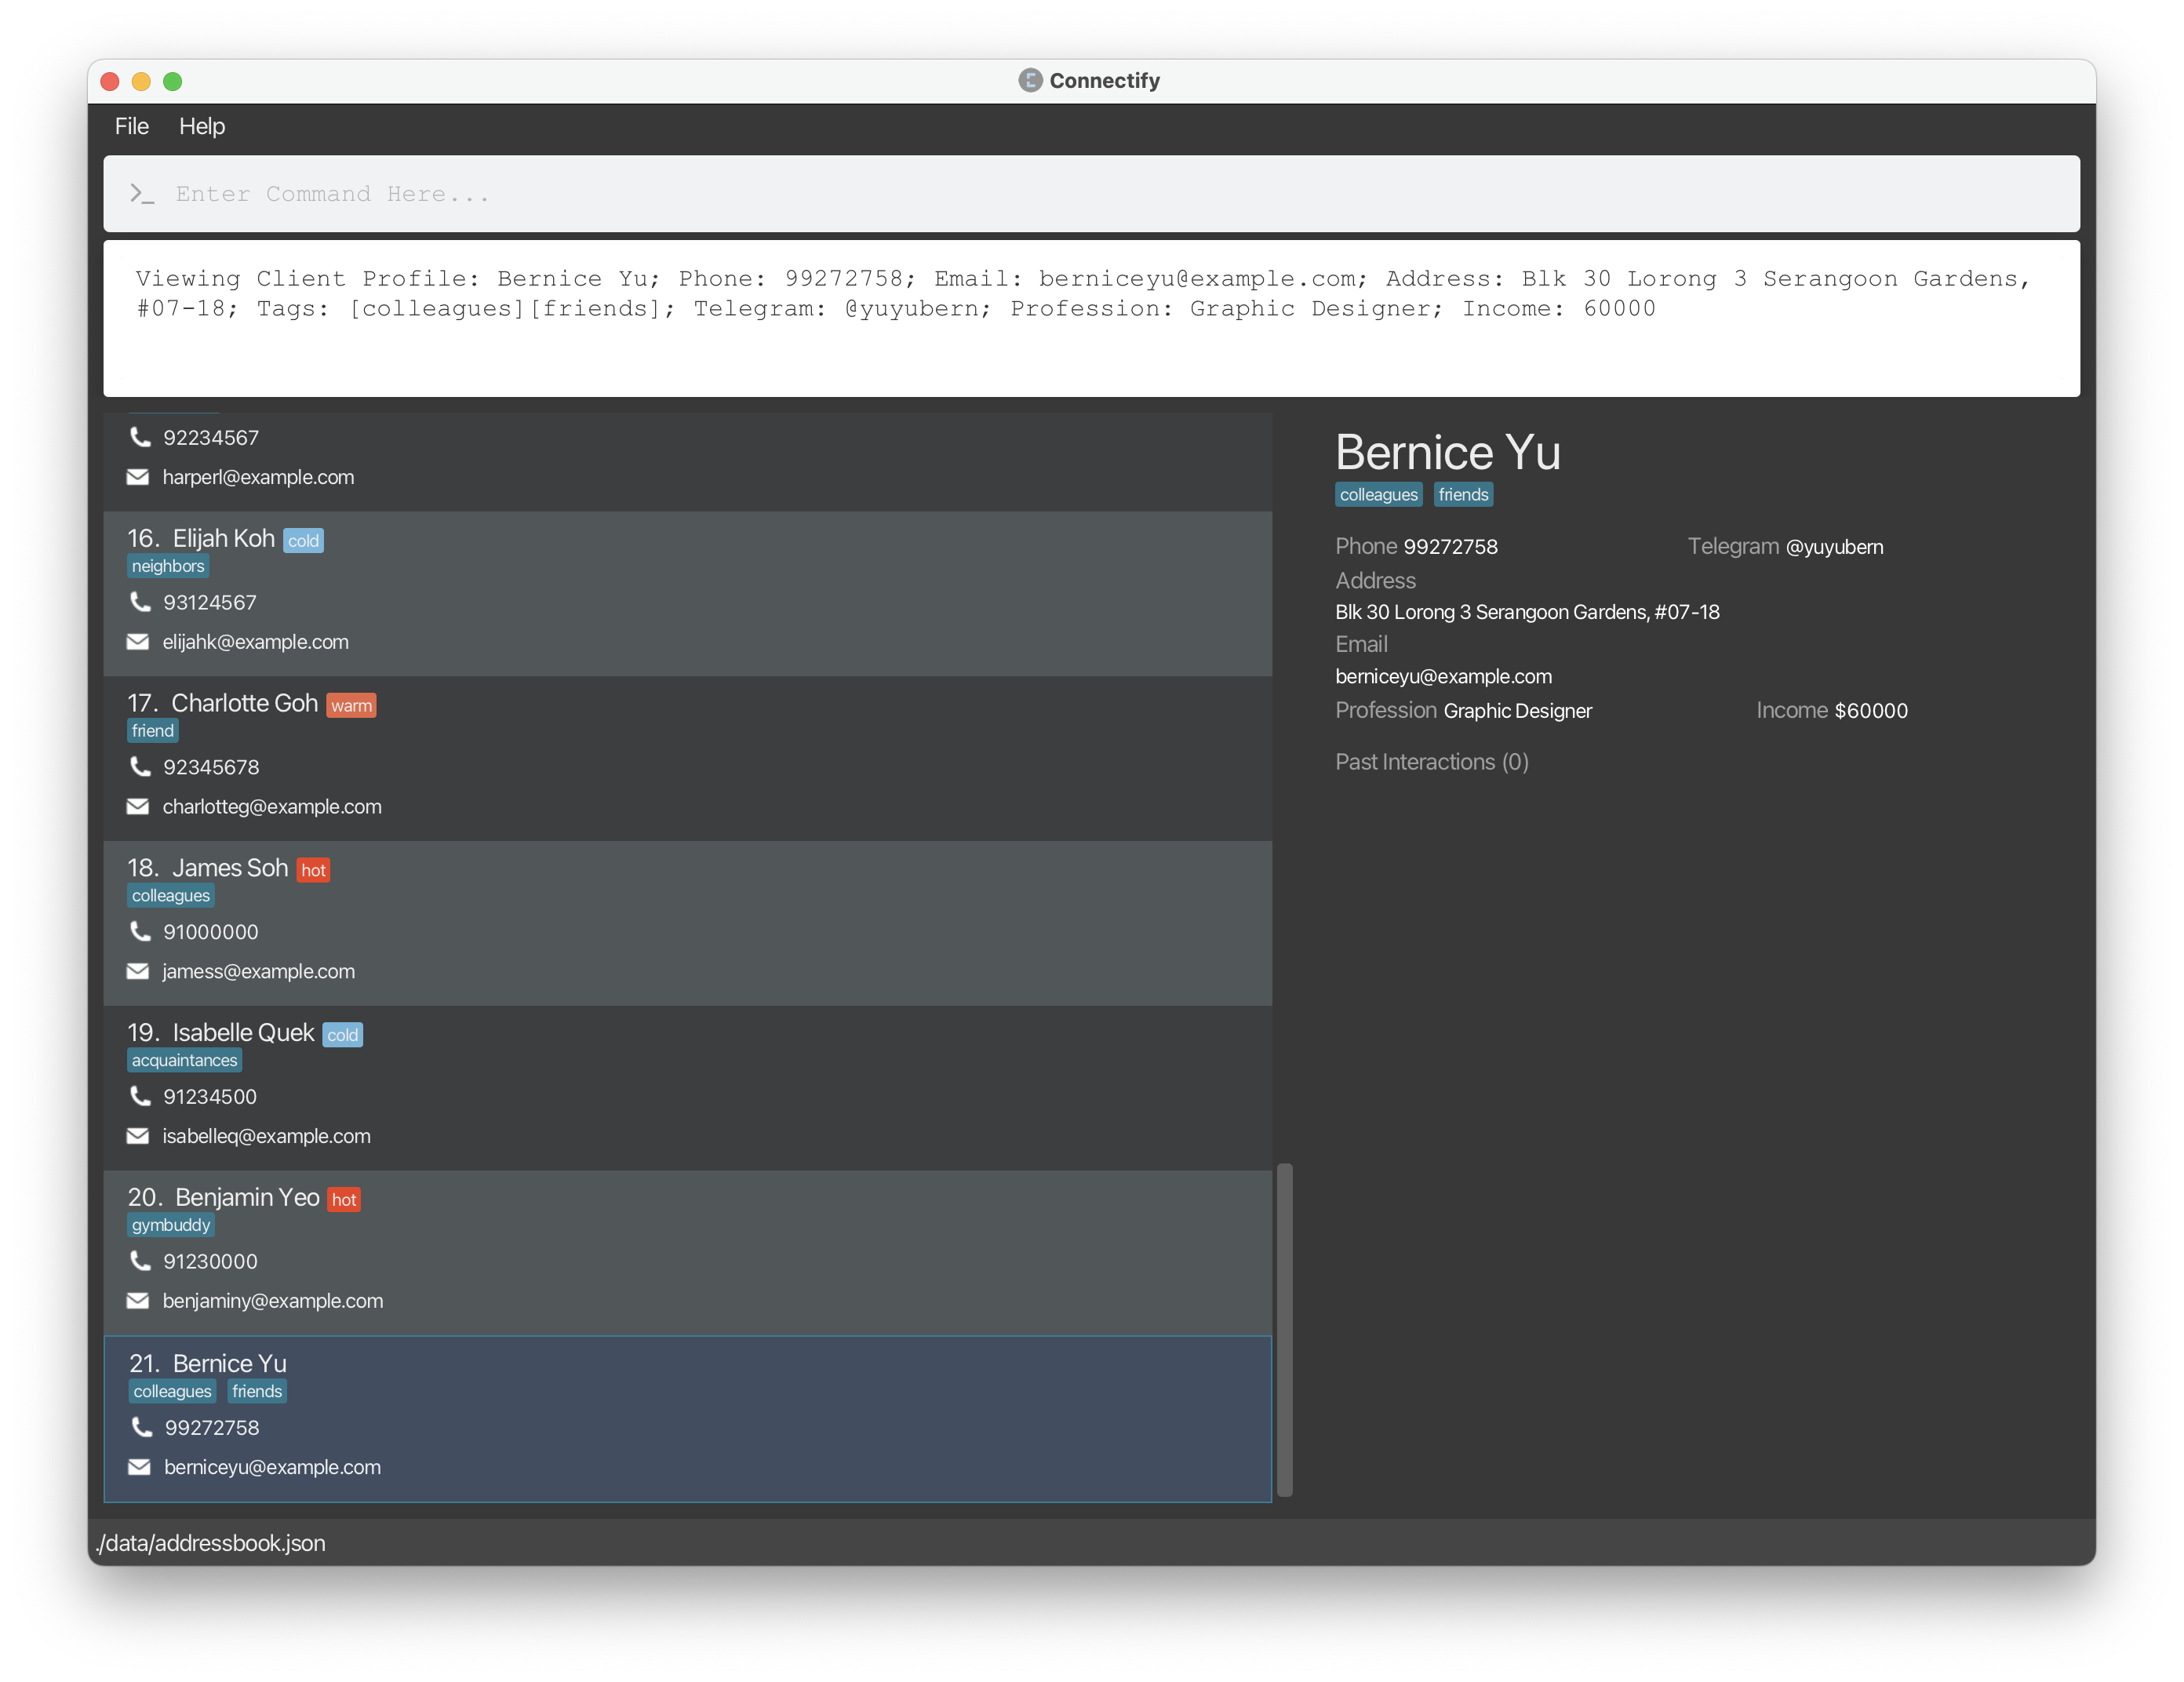
This is Connectify’s client list view. You can switch to it using the list command.
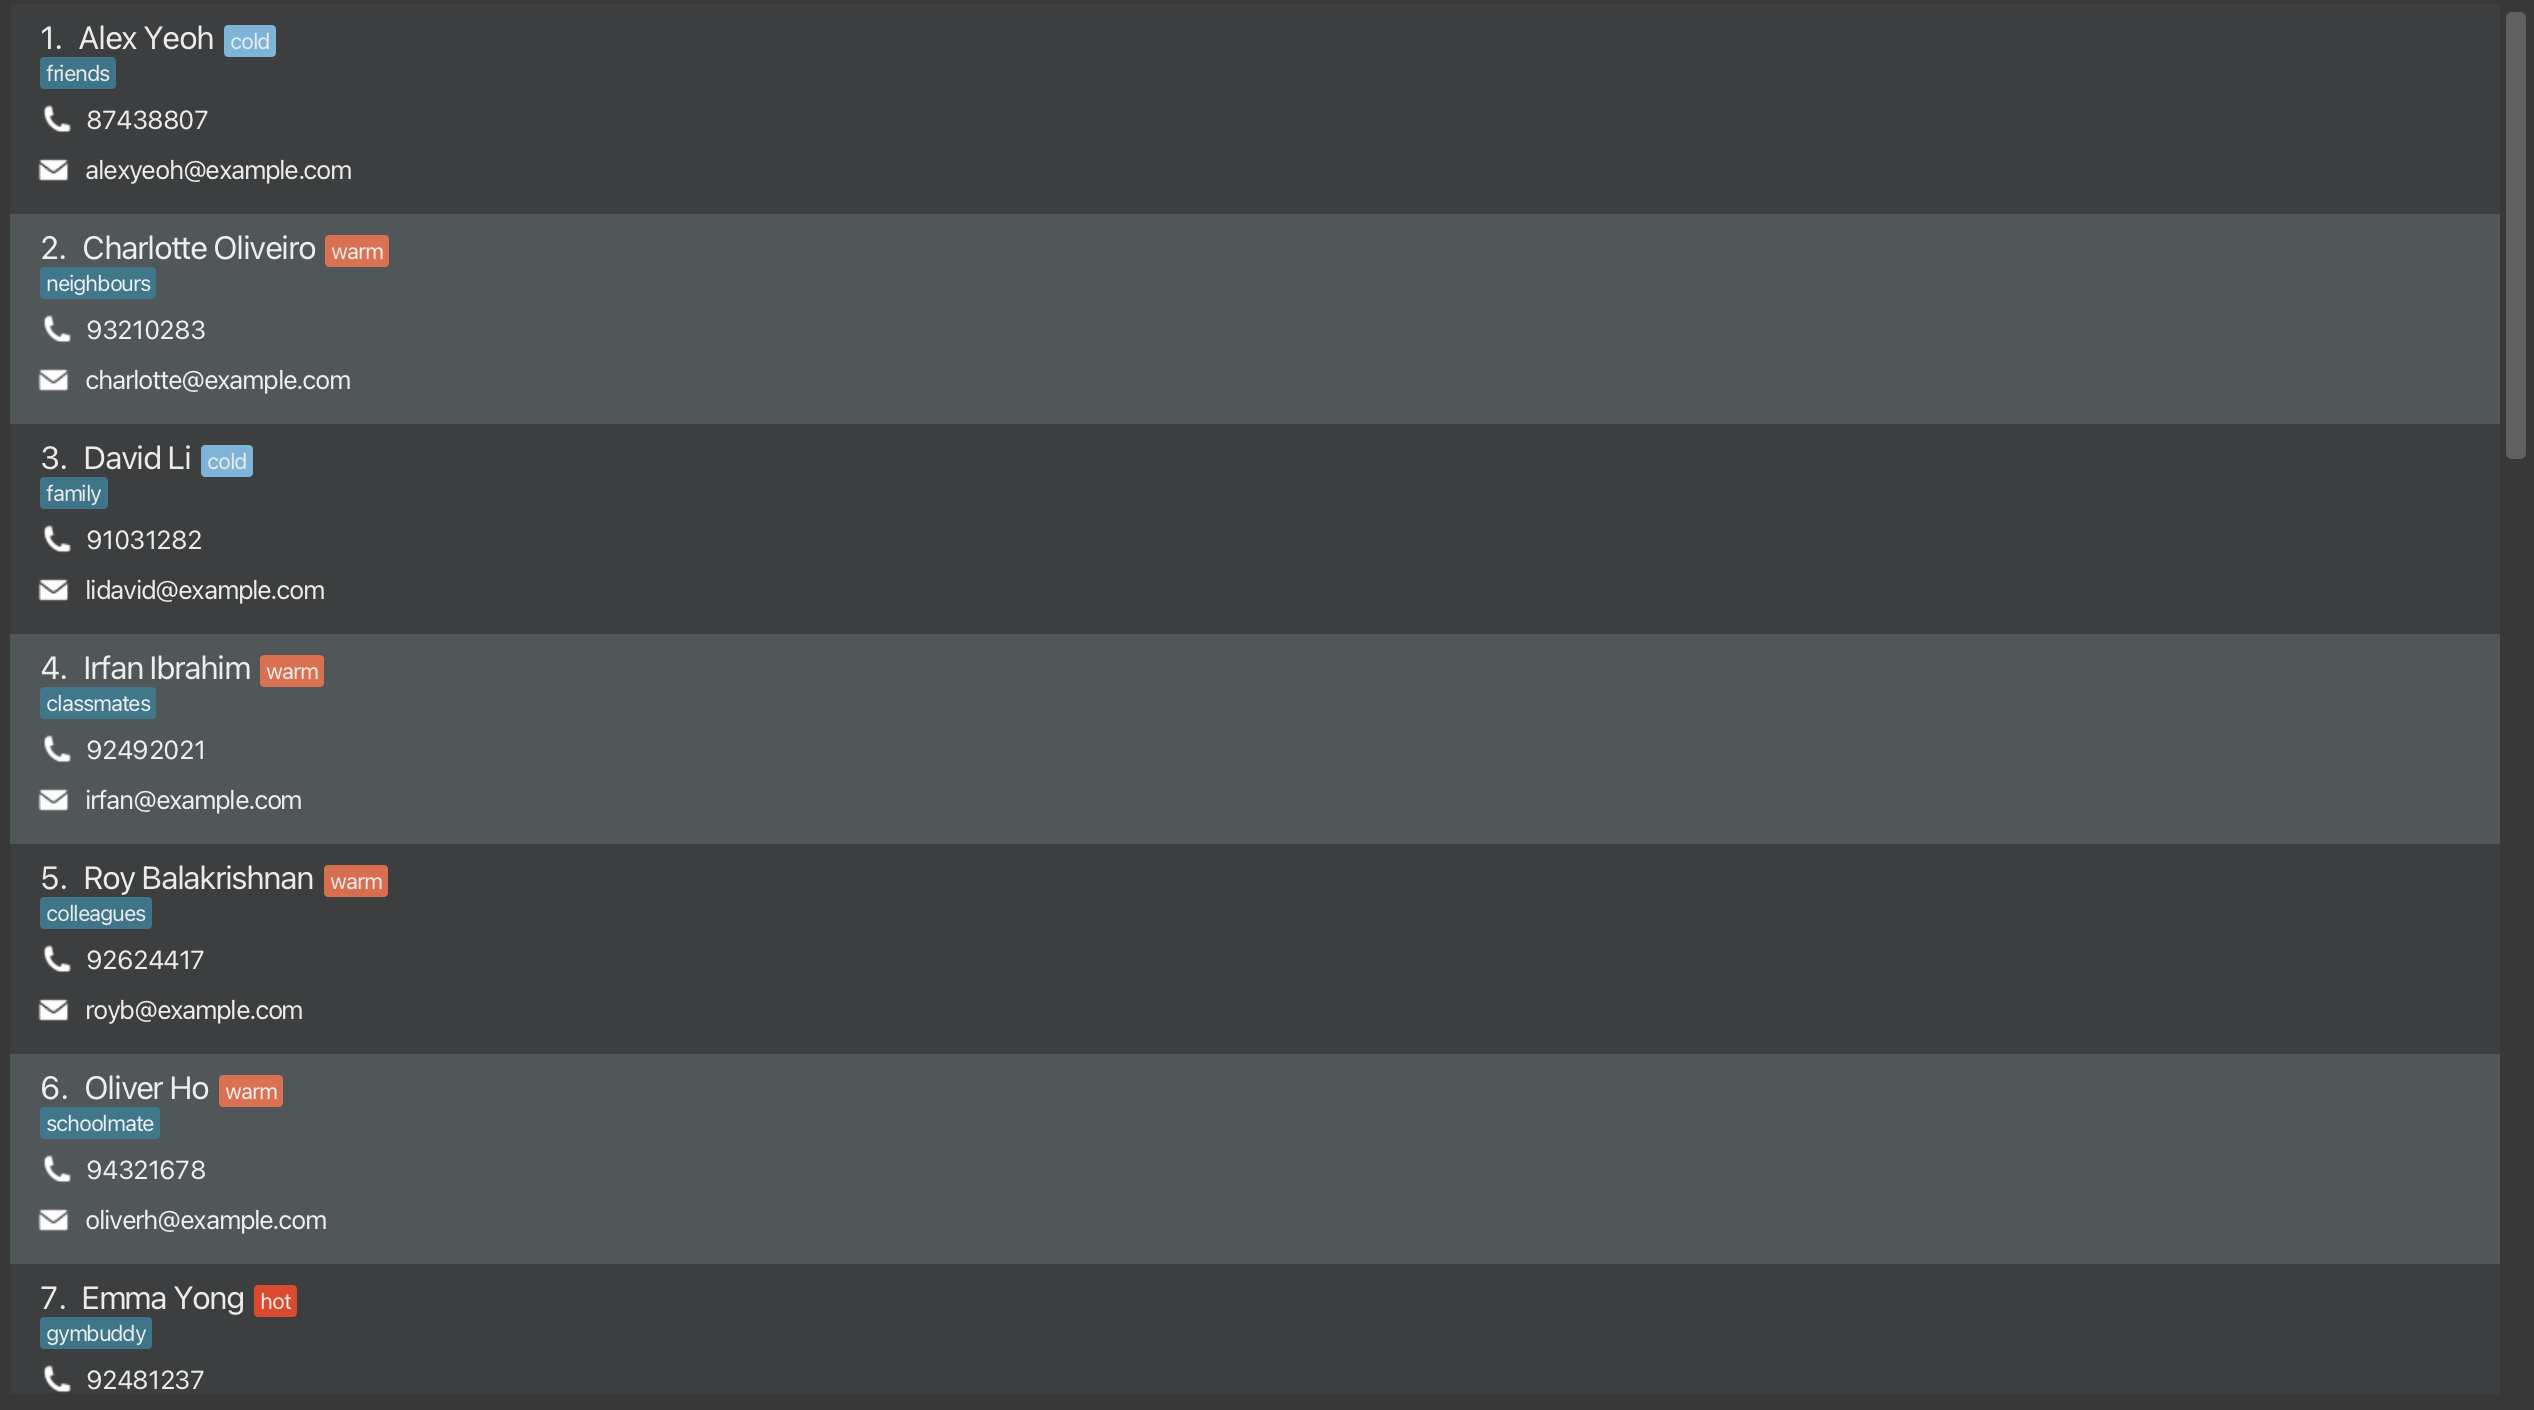
-
Client List: a scrollable list of clients that you have. You can see the details of each client, including:
- Index: the number and order of each client in your client list. The numbering can change using the find command.
- Name: the name of the client, specified after the index number.
- Lead: the lead of the client, represented by either a red, orange, or light blue box.
- Tags: a row of dark green boxes, representing additional information of each client.
- Phone Number: the client’s phone number.
- Email: the client’s email address.
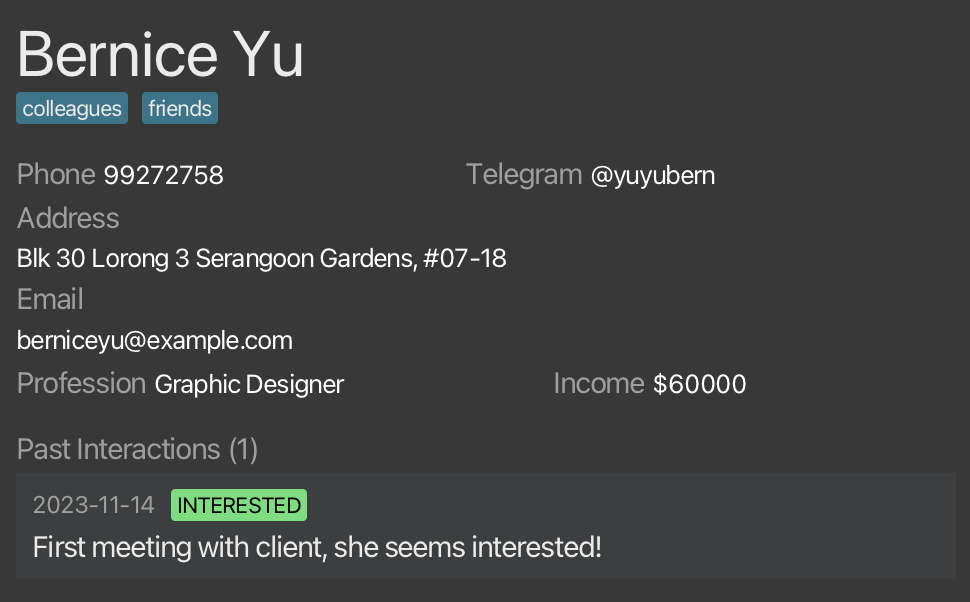
Detailed View of Bernice Yu's Profile -
Detailed View: a detailed view of each client’s profile, showing additional information, including:
-
Telegram Handle: the client’s telegram handle, starting with the letter
@. - Address: the home address of the client.
- Profession: the client’s profession/job.
- Income: the client’s income.
- Past Interactions: the list of past interactions or meetings with the clients, along with its date, interaction outcome (interested), and meeting notes.

The Status Bar (at the bottom of the application window) -
Telegram Handle: the client’s telegram handle, starting with the letter
- Status Bar: the location of where Connectify is storing your data in your computer.
Features
![]() Notes about commands
Notes about commands
-
Commands, flags and parameters are case-sensitive, unless otherwise specified.
-
Items in square brackets are optional.
e.g.
n/NAME [tg/TELEGRAM]can be used asn/John Doe tg/@johndoeor asn/John Doe. -
Items with
...after them can be repeated any number of times, including zero.e.g.
[t/TAG]...can be used ast/friend, ort/friend t/neighbour, whilen/NAMEhas to be used exactly once. -
Parameters can be entered in any order.
e.g. If the command specifies its parameters as
n/NAME p/PHONE,p/PHONE n/NAMEis also acceptable. -
Extraneous parameters for commands that do not take in parameters will be ignored.
e.g. The list command does not take in any parameters. If the command
list 123is entered, it will be interpreted aslist.
Viewing help: help
Shows a message explaining how to access the user guide.

Adding
Adding a client profile: create
Your job as a salesperson starts with adding a client profile to Connectify. This is a one-time process for each client that has been made simple for you. Use the create command to add a client profile.
Format
create n/NAME p/PHONE e/EMAIL a/ADDRESS [t/TAG]... [tg/TELEGRAM]
[pf/PROFESSION] [i/INCOME] [d/DETAILS]
![]() Unique profiles
Unique profiles
Connectify checks for the uniqueness of a profile by its NAME. It doesn’t allow you to create two profiles with the same name. If you happen to have two clients with the exact same name, we suggest differentiating them by adding some notes in brackets!
e.g. John Doe (Company A) vs John Doe (Company B)
Example
create n/Bernice Yu p/99272758 e/berniceyu@example.com
a/Blk 30 Lorong 3 Serangoon Gardens, #07-18 t/colleagues
t/friends tg/@yuyubern pf/Graphic Designer i/60000

You should directly see the client profile added to the list of clients in the application window. After adding a client profile, you can now perform various operations on the client profile as specified in the next few sections!
Adding a client interaction: interaction
After contacting your client, you may want to log your interactions with them. Use the interaction command when you want to record an interaction you had with a client.
Format
interaction INDEX o/OUTCOME [DETAILS]
![]() Notes about the interaction command
Notes about the interaction command
-
INDEXrefers to the index of the client profile in the displayed list of clients. -
At least one of the
OUTCOMEorDETAILSparameters must be provided. -
OUTCOMEmust be one of the following:INTERESTED,NOT_INTERESTED,CLOSED,UNKNOWN. -
OUTCOMEis not case sensitive.interestedis also a valid outcome.
Example
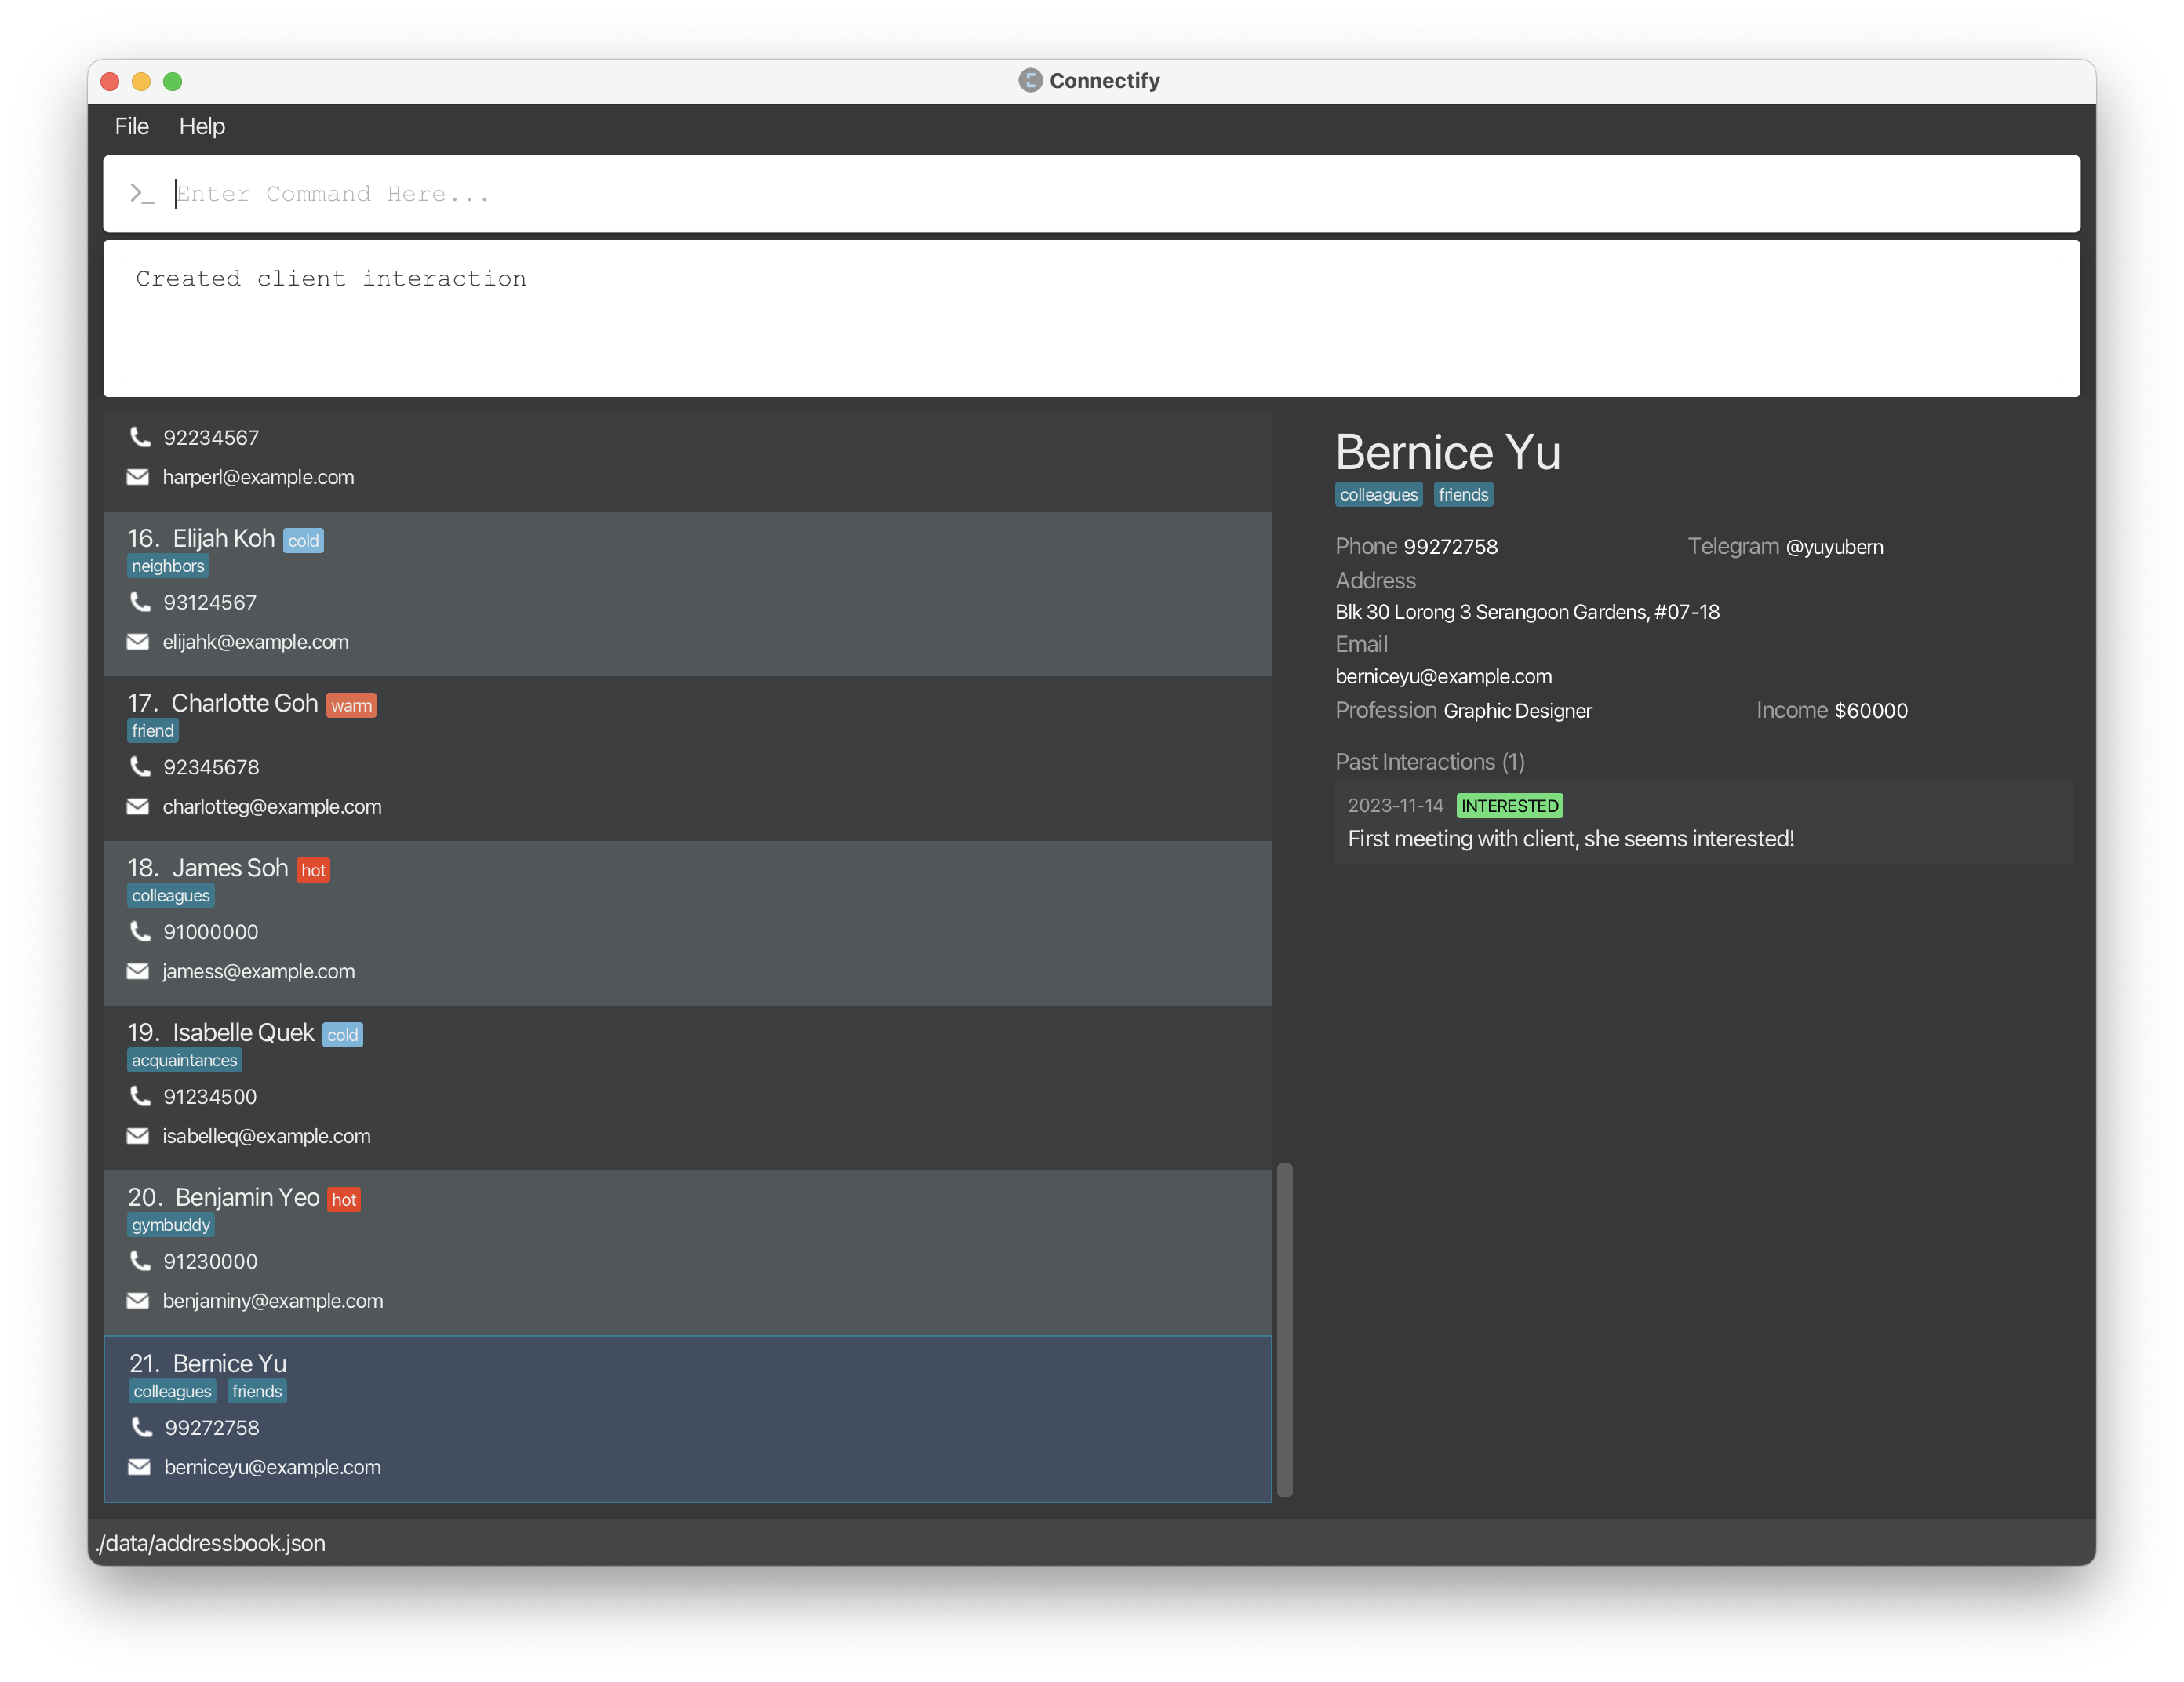
interaction 21 o/INTERESTED First meeting with client, she seems interested!
You should directly see the interaction added to the client profile in the application window.
Viewing
Sometimes, you may want to view the details of a client profile or the interactions you have had with a client to quickly catch up before contacting them.
This section contains multiple commands that allow you to view various details of your clients that are collated in a single view for your convenience.
Viewing the dashboard: dashboard
To keep track of comprehensive statistics about your performance, Connectify provides you with the dashboard command. Use the dashboard command to view summarised information on your client interactions and your important follow-ups.
Format
dashboard
You should see the following dashboard view in the application window.
See what each section of the dashboard means.
Viewing the list of clients: list
From the dashboard, you may wish to see a comprehensive list of your clients. Use the list command to view all clients.
Format
list
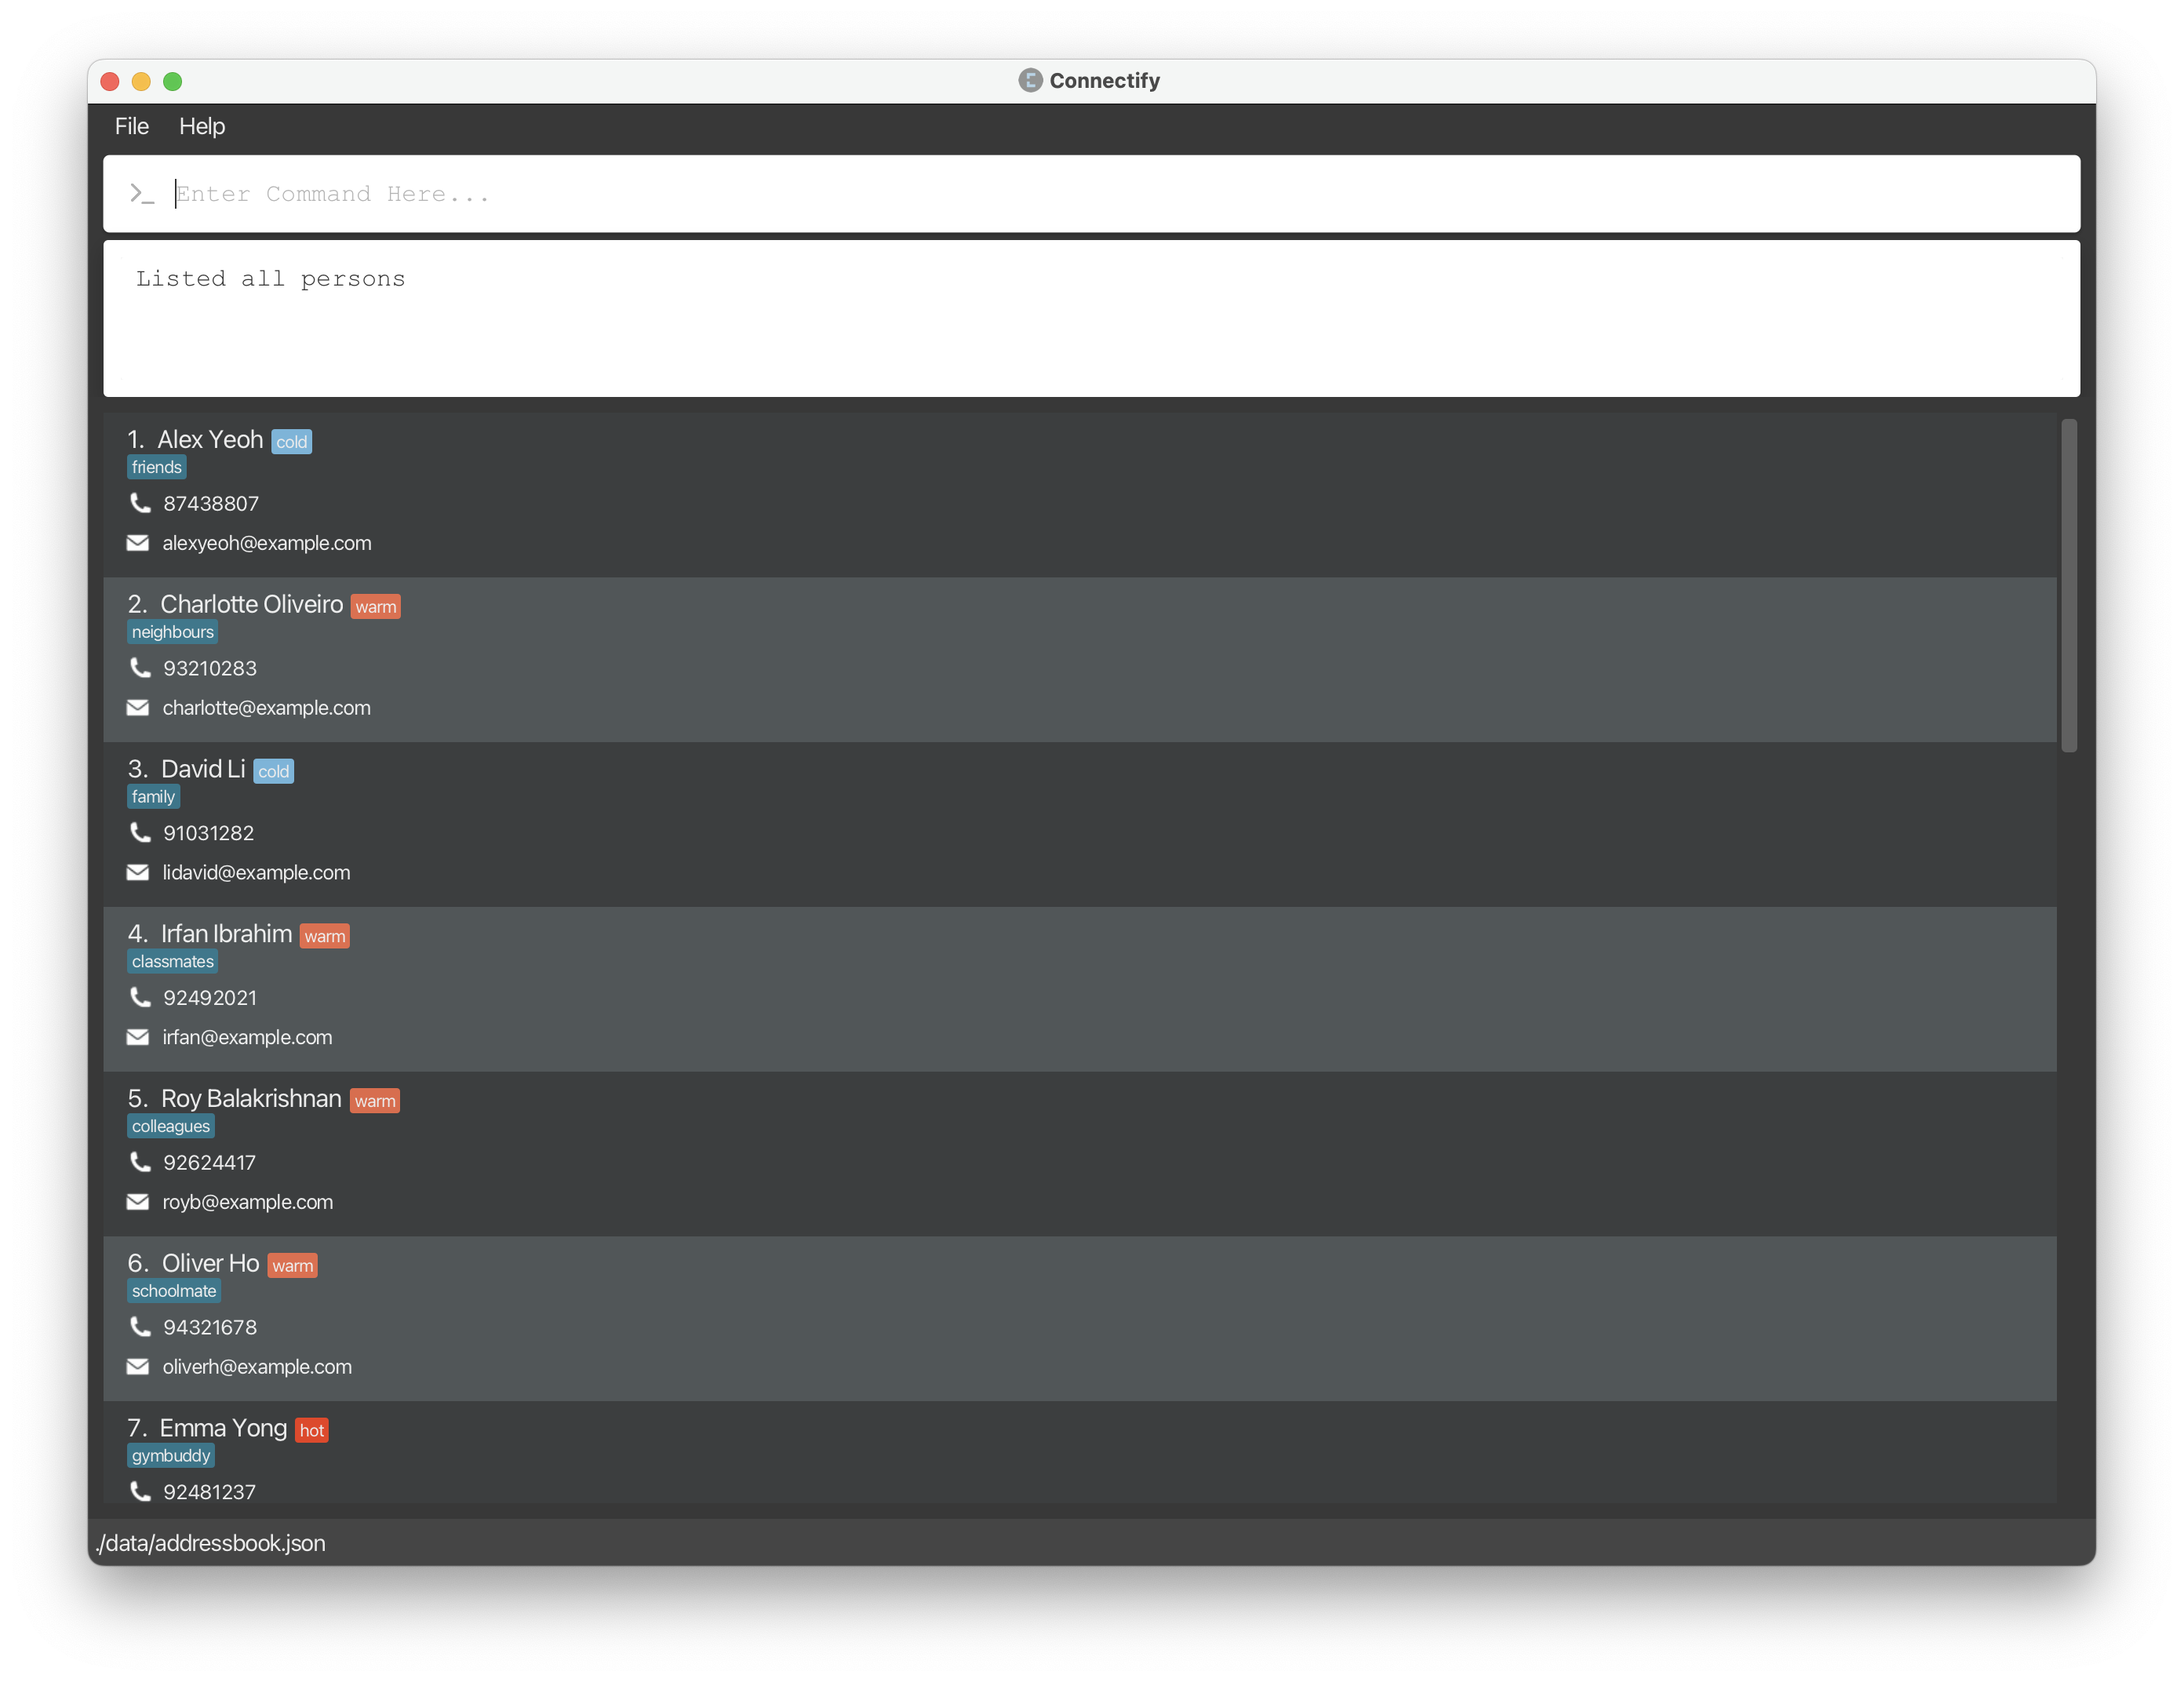
You should then see the list of clients in the application window.
Viewing the full details of a client: view
Catching up on the details of a client before contacting them is important. Most of the time, remembering the details of previous interactions with a client is difficult as the data is scattered everywhere.
Connectify gives you the powerful view command to view the full details of a client profile in a single view.
Format
view INDEX
![]() Notes about the view command
Notes about the view command
INDEX refers to the index of the client profile in the displayed list of clients.
Example
view 3
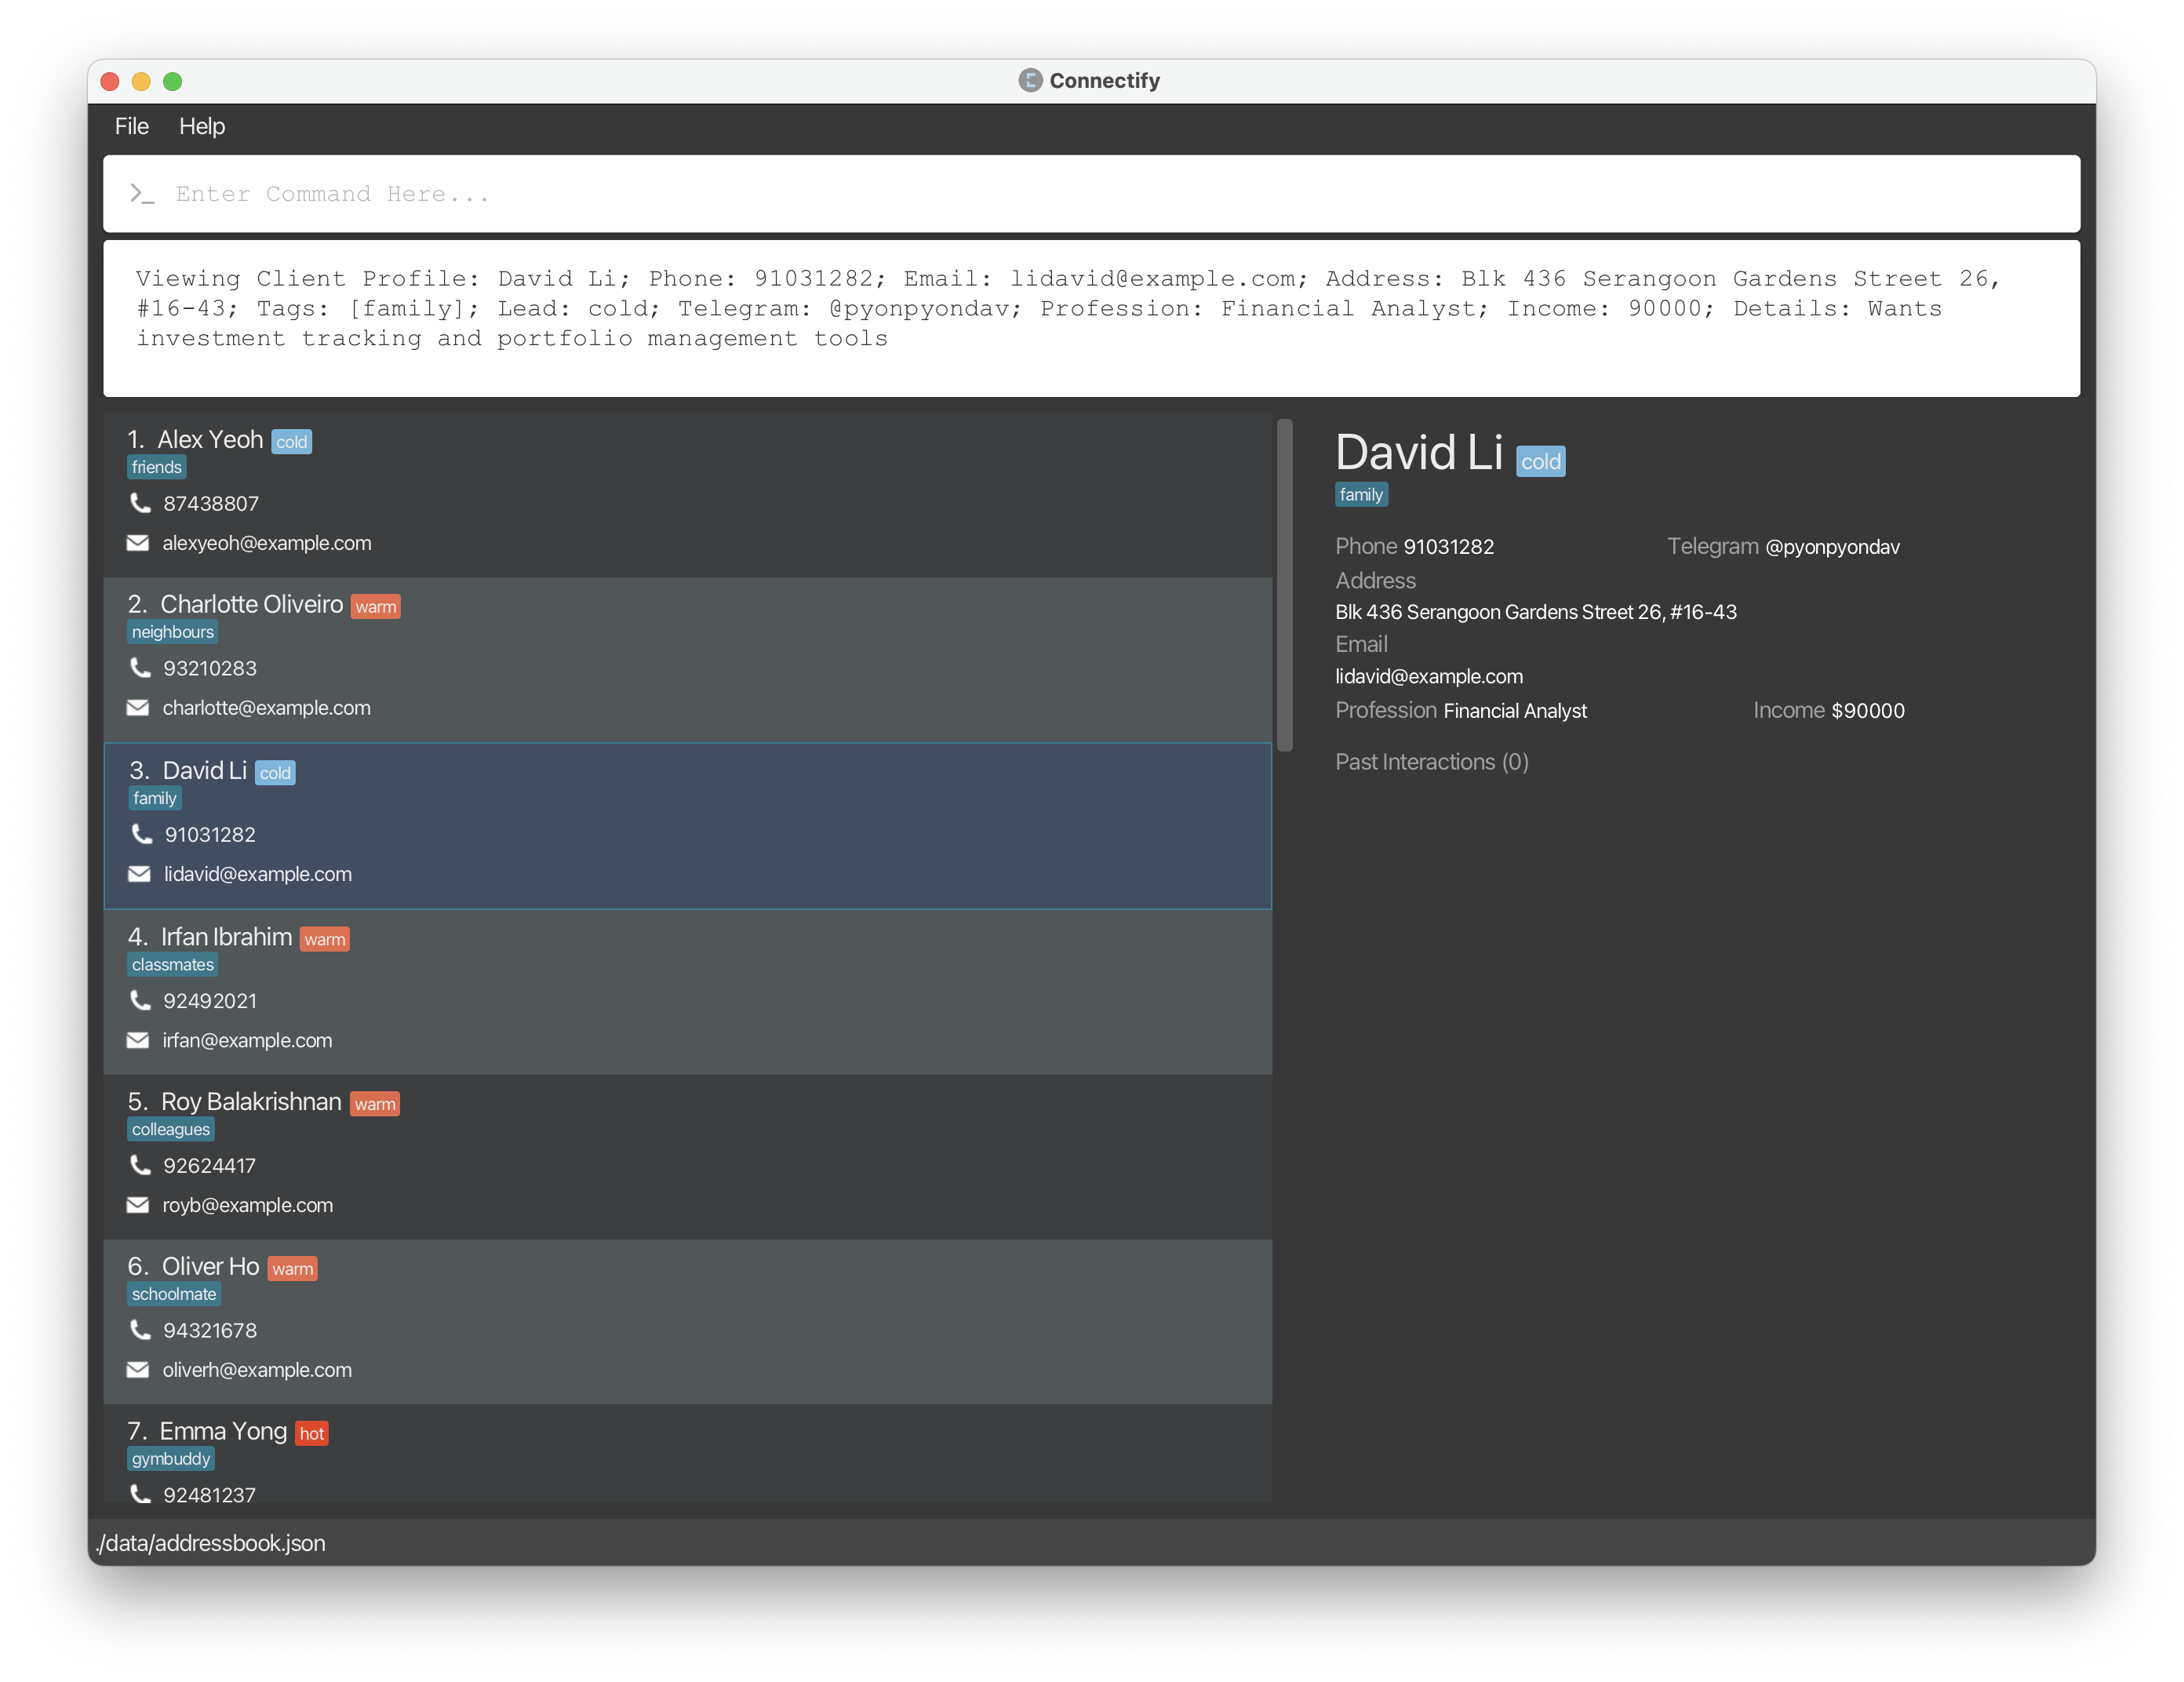
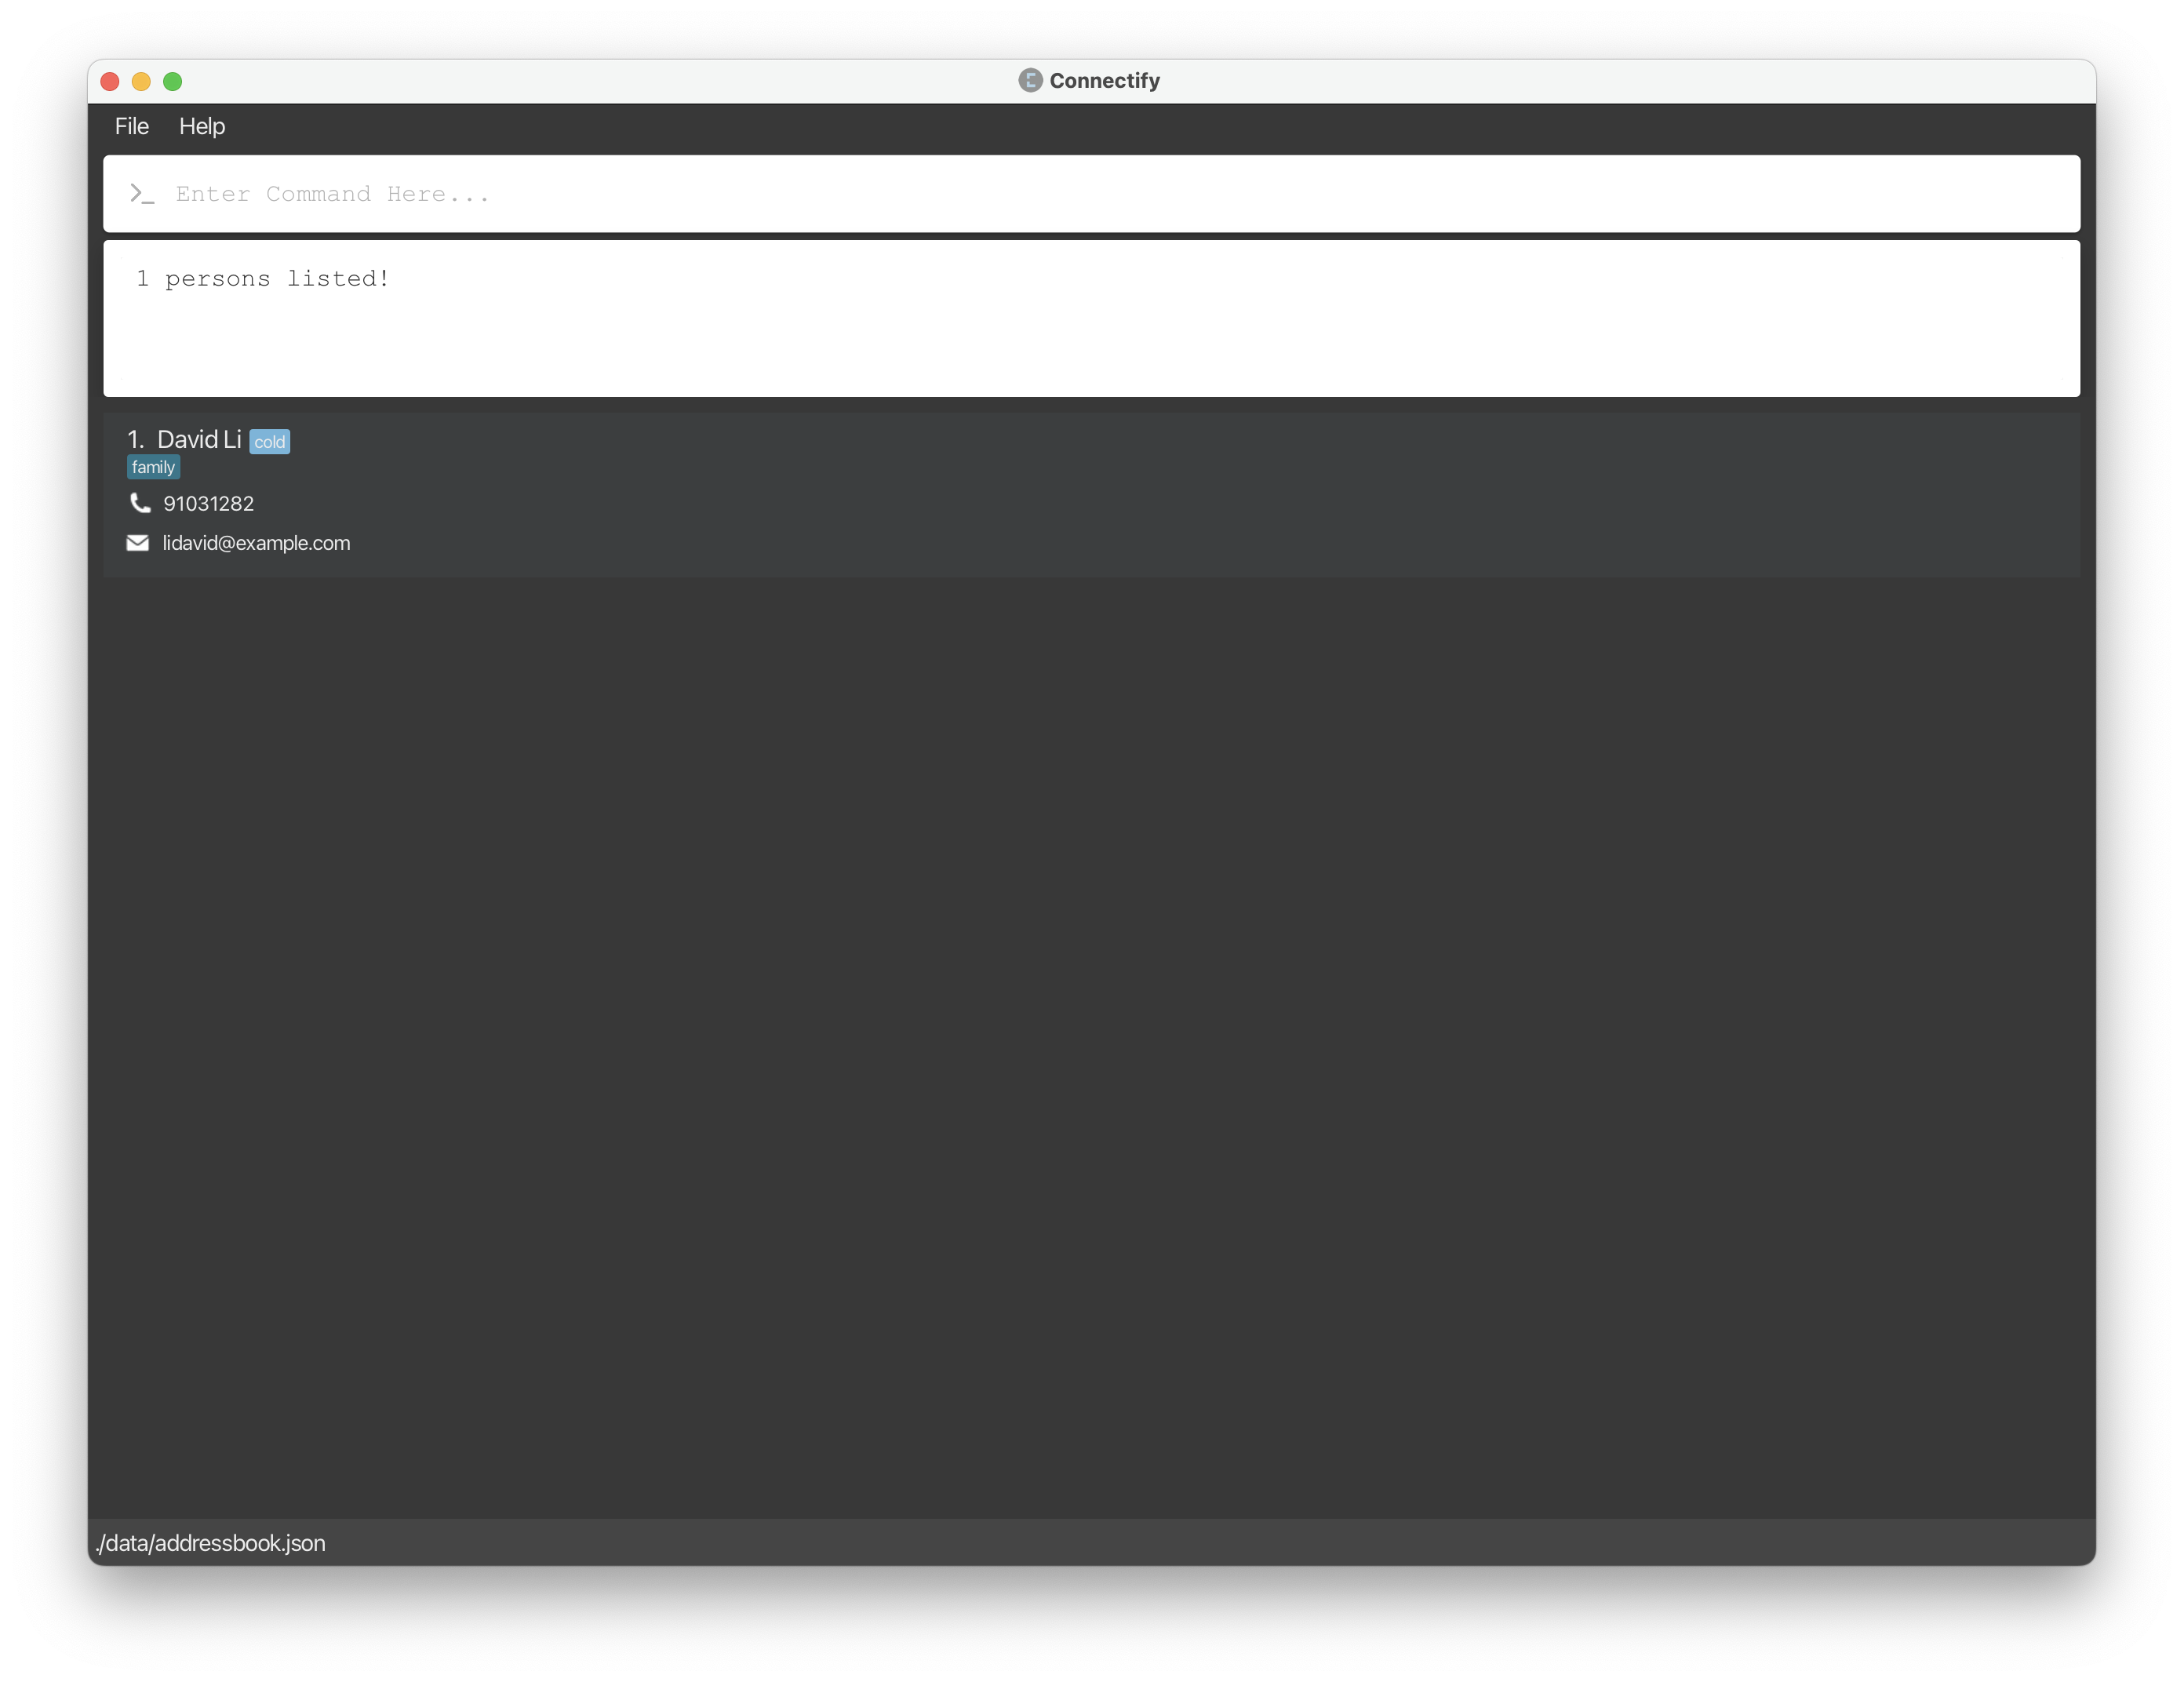
Finding a client by name: find
Managing a large client list can be difficult. Sometimes their index on the list can be hard to remember and this could affect your experience keying in certain commands. Don’t worry though, we have a solution for you! The find command allows you to search for a client by name, and you can use this client’s index (usually 1) in other commands.
Format
find NAME
![]() Notes about the find command
Notes about the find command
You need to type either the first, middle or last name of the client. You cannot type a partially spelt name!
Example
find David
Editing
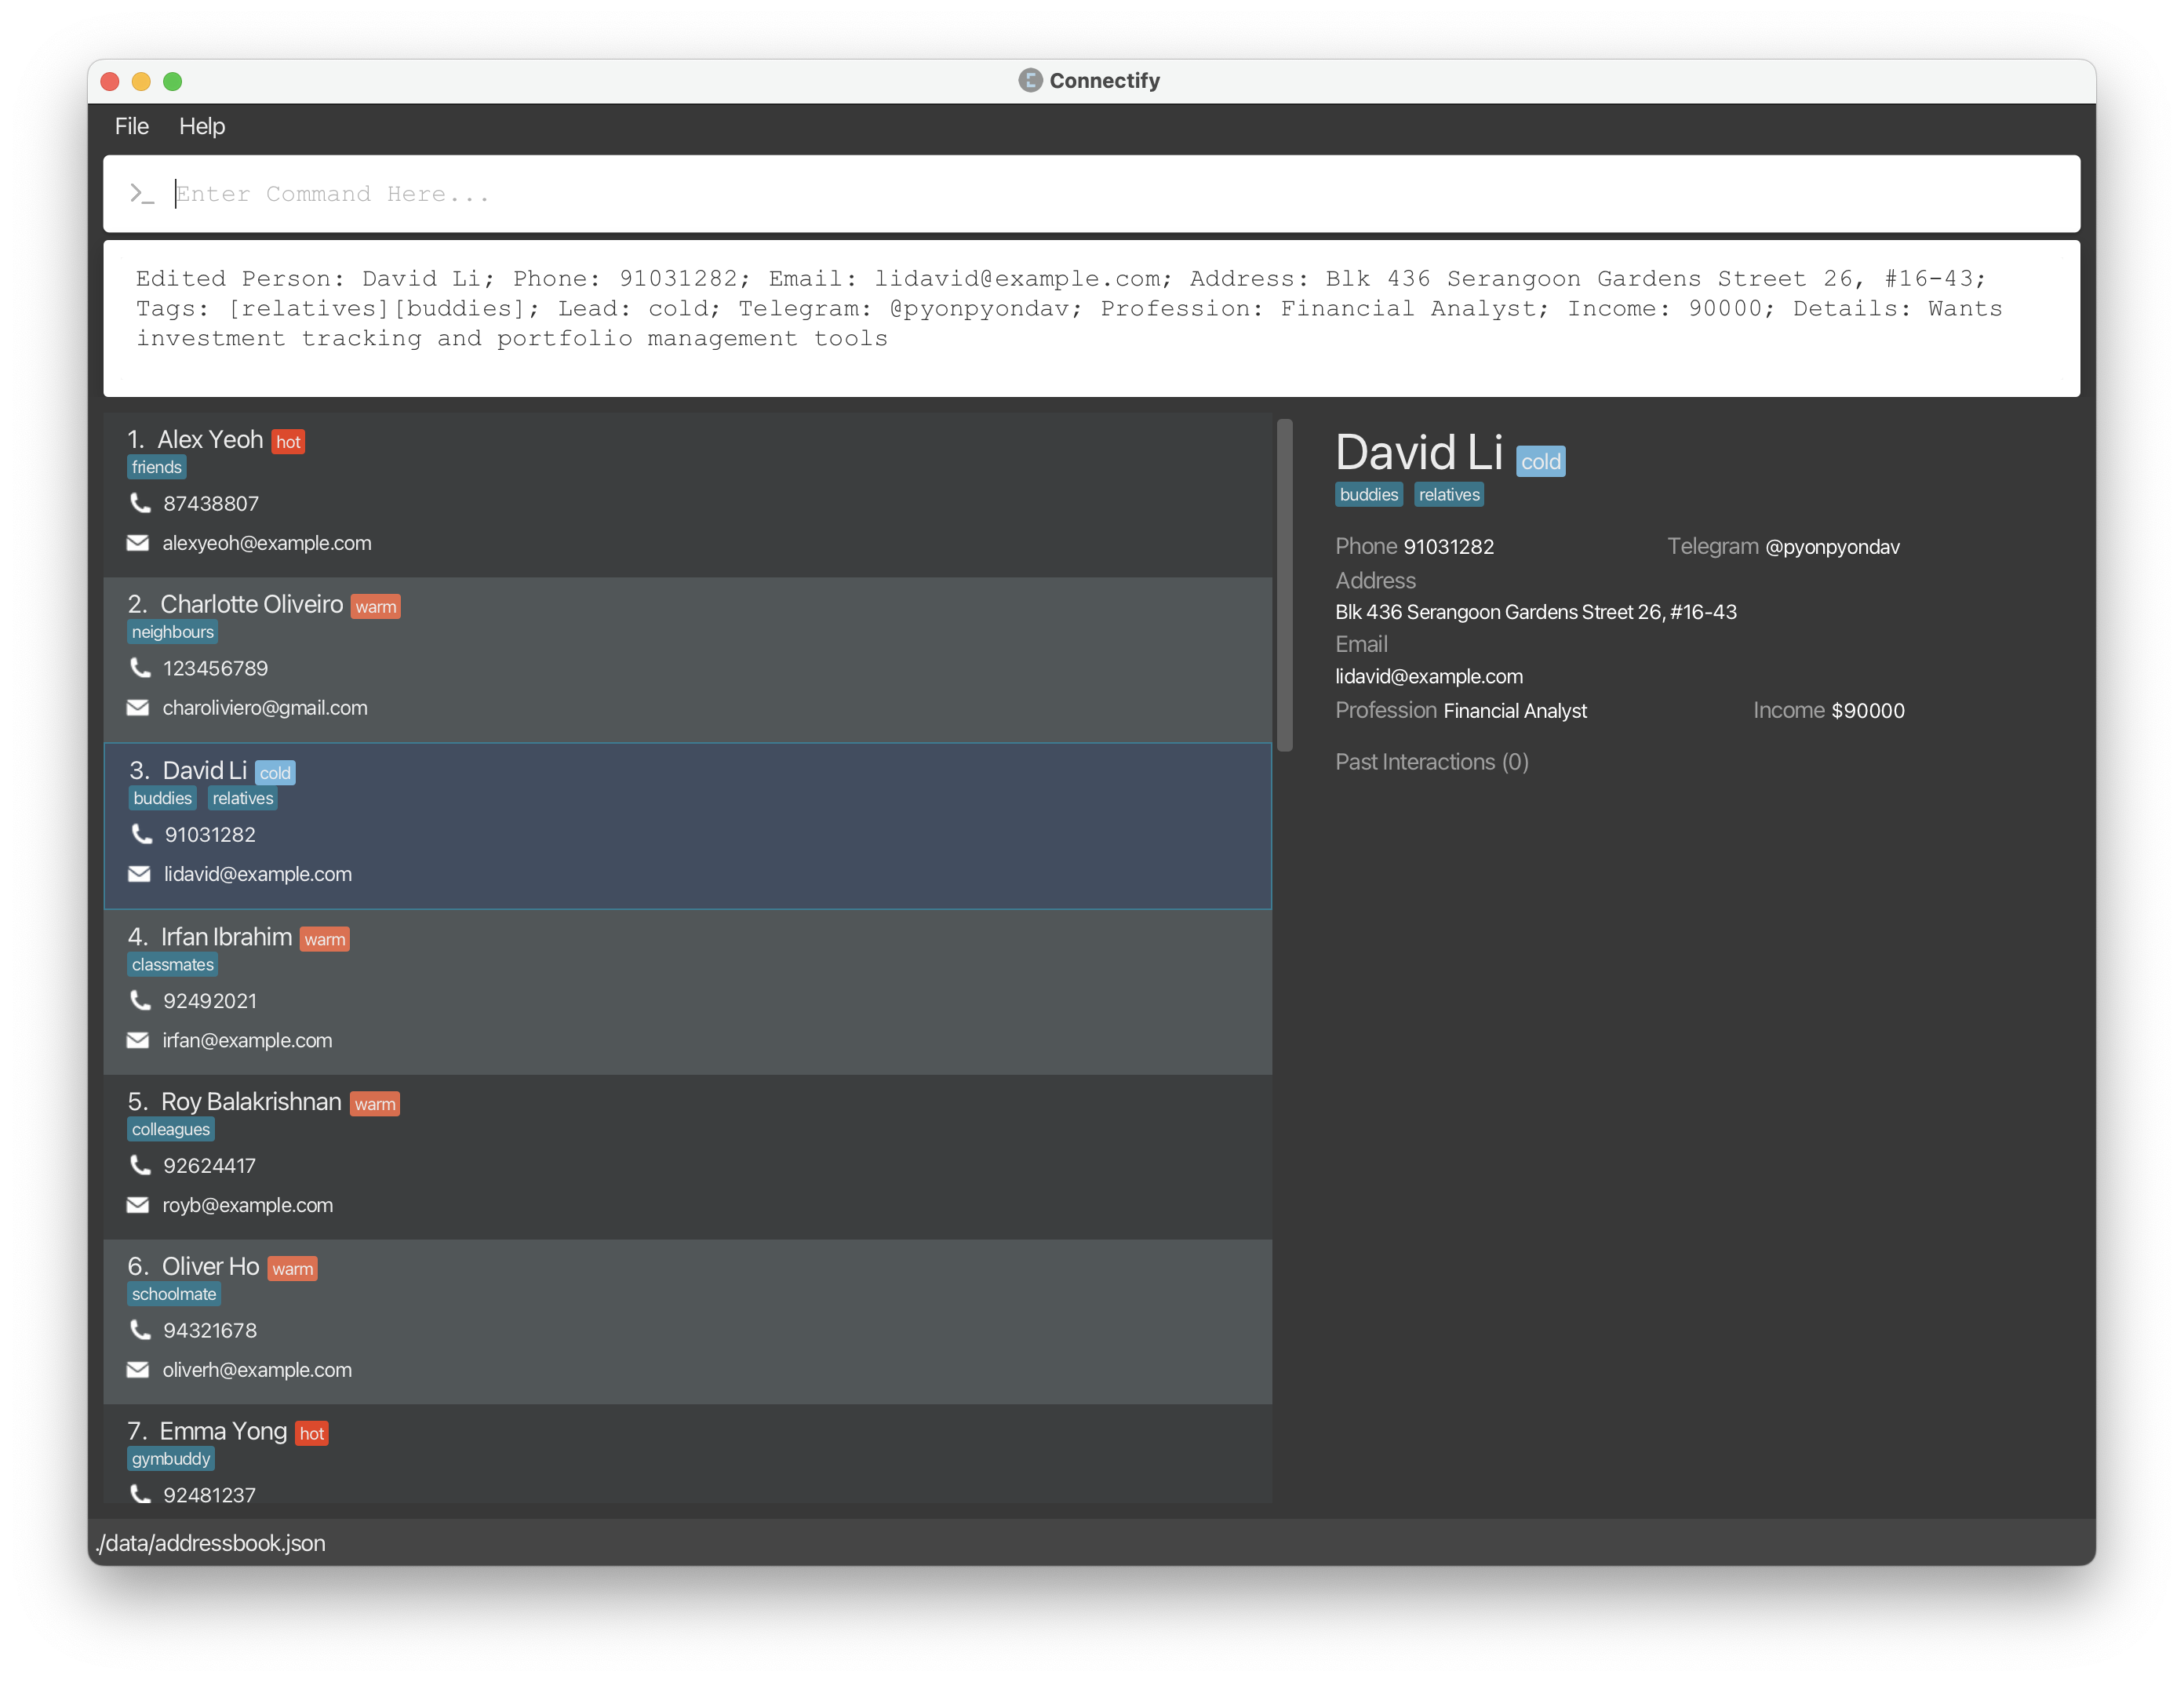
Editing a client profile: edit
Over time, you may need to update the details of a client profile to reflect the most current information. Use the command edit to edit the specified client profile in your client list.
Format
edit INDEX [n/NAME] [p/PHONE] [e/EMAIL] [a/ADDRESS] [t/TAG]... [l/LEAD]
[tg/TELEGRAM] [pf/PROFESSION] [i/INCOME] [d/DETAILS]
![]() Notes about the edit command
Notes about the edit command
-
INDEXrefers to the index of the client profile in the displayed list of clients. -
At least one of the optional parameters must be provided.
Example
edit 1 l/HOTedit 2 e/charoliveiro@gmail.com p/123456789edit 3 t/buddies t/relatives
Clearing all tags of a client
You can use the edit command to clear all tags of a client by supplying an empty tag parameter! For example, if you wish to clear the tags of a client at index 4, use edit 4 t/.
Editing a single field
We understand the edit command can be a little tedious to use if you only want to edit a single field of a client profile. Hence, we have provided a shortcut for you to edit a single field of a client profile. This command is special because its command word is the same as the field you want to edit.
Format
FIELD INDEX NEW_VALUE
Example
-
name 1 John Doe: Changes the name of the client at index 1 toJohn Doe.
![]() Notes about this shortcut
Notes about this shortcut
-
INDEXrefers to the index of the client profile in the displayed list of clients. -
All valid
FIELDparameters: name, phone, email, address, lead, telegram, profession, income, details. -
This does not work for the client’s tags.
Common use case: marking a client as a hot, warm, or cold lead
As salespeople, we need to gauge the likelihood of a client of becoming a buying customer. We use hot leads to represent a customer with high potential, and cold leads to represent customers with low potential.
You can use the lead command to mark a client as a hot, warm or cold lead. For example, if you wish to mark the client at index 4 as a cold lead, enter lead 4 cold.
Note that this changes the follow-up period of the client.
Deleting
Deleting a client profile: delete
Keep the list of clients in Connectify clean by deleting client profiles that are no longer relevant.
Deleting a client profile is easy with the delete command.
Format
delete INDEX
Example
delete 1
Deleting all clients: clear
If you want a fresh start, use the clear command. Be careful, this clears your entire client list!
Format
clear
Exiting the program: exit
Quits the Connectify application.
Format
exit
Miscellaneous Notes
Follow-up Calculation
The follow-up date is calculated by the day of last interaction plus a follow-up period, determined by lead type as shown:
| Lead Type | Follow-Up Time |
|---|---|
| HOT | 1 week |
| WARM | 4 weeks |
| COLD | 8 weeks |
| UNKNOWN | 4 weeks |
For example, if your last interaction with John is on 1 Jan 2021 and he is a HOT lead, the follow-up date will be 1 week after 1 Jan 2021, which is 8 Jan 2021.
Parameter constraints
Some parameters have constraints on the inputs they accept. Although our app notifies you of such issues when they arise, this section lists some common constraints worth noting.
Phone numbers
Phone numbers can only 3-15 contain digits. An optional + sign is allowed in front.
Tags
The tag parameter t/TAG only allows alphanumeric inputs with no spaces. For example, t/familyfriend is allowed, but t/family friend or t/family-friend is not allowed.
Incomes
Incomes consist only of numerical inputs. Connectify does not yet support:
- Decimal values
600.50 - Currencies
10000 USD - Other non-numeric input e.g.
10,000
Command history
You can use the up arrow key ↑ to view your past commands and press Enter to execute them again.
This is especially useful if you find yourself having to re-enter a command that was not accepted due to an error. For example, your parameters may not have conformed to the constraints above.
FAQ
Q: How do I save my progress?
A: Your progress is saved after every command automatically.
Q: How do I transfer my data to another computer?
A: Follow these steps:
-
Find your data folder - it should be in the same directory as your
connectify.jarfile.If your Connectify jar file is at
C:\Users\John\Desktop\Connectify\connectify.jar, the data folder will be atC:\Users\John\Desktop\Connectify\data. If you’re having trouble finding the data folder, refer to the status bar.
 -
Download Connectify on the other computer.
-
Paste the data folder in the same directory as your
connectify.jarfile in your other computer.
Q: How do I know if Java 11 is already installed on my computer?
A: Open up your favourite command line application and run the command java --version. The output should contain java 11 if Java 11 is installed.
Q: How do I install Java 11 on my computer?
A: Head to the official download page here, then download and run the installer for your operating system.
Q: Can I run this application on any operating system?
A: This application can be run on Linux, Windows, and macOS, as long as you have Java 11 installed.
Q: How do I contact the development team?
A: Please head to our About Us page for our contact details. For bug reports or feature requests, please head to our GitHub repository to file an issue.
Q: Do I need to be connected to the internet to run this application?
A: No, an internet connection is not required to use any of our application’s features.
Q: Can I contact my clients through the application?
A: No, this is currently not possible.
Known Issues
New follow-ups may not be added after a client is marked as a “hotter” lead
Changing a client’s lead to a “hotter” lead, e.g. from COLD to HOT, may not add a new follow-up to the dashboard. This is because the follow-up date is calculated based on the client’s last interaction date and the lead type. Since a hotter lead type has a shorter follow-up period, if the new follow-up date has already passed, no follow-ups are added to the dashboard for the client.
Follow-ups do not update automatically on a new day
The content of the dashboard will only update whenever the view is switched to the dashboard. This means that if you leave the dashboard open overnight, the follow-ups will not be updated until you switch to the client view and then back to the dashboard view.
Command summary
| Action | Format | Example | |
|---|---|---|---|
| Help | help |
help |
|
| Add Client | create n/NAME p/PHONE e/EMAIL a/ADDRESS [t/TAG] [tg/TELEGRAM] [pf/PROFESSION] [i/INCOME] [d/DETAILS] |
create n/Bernice Yu p/99272758 e/berniceyu@example.com a/Blk 30 Lorong 3 Serangoon Gardens, #07-18 t/colleagues t/friends tg/@yuyubern pf/Graphic Designer i/60000 |
|
| Add Interaction | interaction INDEX o/OUTCOME [DETAILS] |
interaction 1 o/INTERESTED d/Client is interested in our products |
|
| View Dashboard | dashboard |
dashboard |
|
| View Client List | list |
list |
|
| Find Client | find NAME |
find Chemmy |
|
| View Client Details | view INDEX |
view 1 |
|
| Edit Client | edit INDEX [n/NAME] [e/EMAIL] [a/ADDRESS] [t/TAG] [l/LEAD] [tg/TELEGRAM] [pf/PROFESSION] [i/INCOME] [d/DETAILS] |
edit 2 e/berniceyu@gmail.com p/123456789 |
|
| Edit Single Field (Shortcut) | FIELD INDEX NEW_VALUE |
name 1 John Doe |
|
| Delete Client | delete INDEX |
delete 1 |
|
| Clear Client List | clear |
clear |
|
| Exit | exit |
exit |